Saturday, 20 September 2014

Secret garden poppies…

I was lucky enough to attend a PaperArtsy training day recently with some of our DT and it’s completely re-awakened my love of stencilling. Today’s project is fairly simple but very effective…


I starting with a square of white card, a brayer and autumnal coloured PaperArtsy Fresco paints of Toffee, Butternut, Haystack and Smoked paprika to make the background:


This stamp of Lin Brown's makes a gorgeous background feature when stamped with Snowflake Fresco:

Layered texturing has been created with these Ellen Vargo stamps and theFresco paints to get this result:


The background so far, mounted:

A scrap of cardboard packaging painted with Haystack Fresco makes a great base for the stencil:

Hey pesto Fresco has been stippled through the stencil and allowed to dry. Then the poppy pods are added using the Smoked paprika. That too has to dry before adding the shading of Claret Fresco:


Having decided that the feature would be set to the left of the card, I used the stencil text to add a focal point bottom right using black DI applied with a blending tool:

Card centre:

Text:

Left focal point:

Complete:


A big thank you to Susan for inviting us to go and to Leandra, Lin and Jo for a fab, fun day!

If you haven't done any stencilling recently folks get them out, dust them off and see what you can do - great fun! >:o)

Thanks for stopping by, have a great day!

Chris xxx


Thursday, 18 September 2014

Tim Holtz dies: not just for grown-ups

This month my little boy and his two best friends turn 3 years old, a fact I'm struggling to get my head around! The first of the birthdays was for a little boy who loves diggers, so I made this textured muddy building site scene, complete with brick wall.


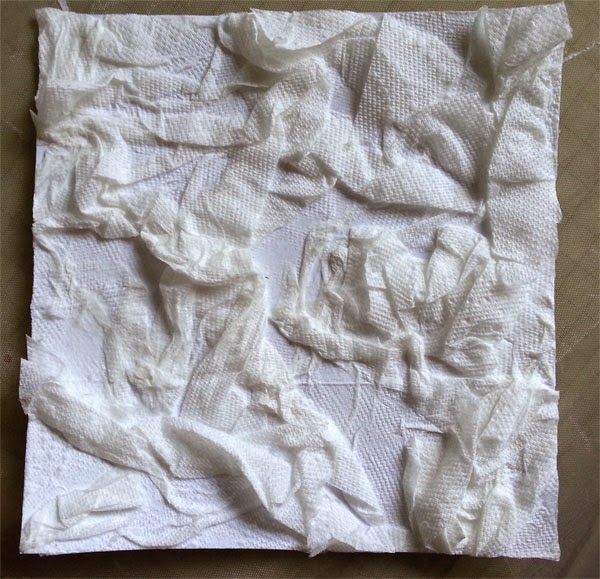
First I separated a kitched towel into layers, scrunched it up and stuck to plain card with PVA glue.


Then I painted it with two colours of brown chalk acrylics, blending them on the project, to make a nice mud effect.


Next I cut a brick wall from thin grey card using a Tim Holtz decorative strip die. Taking care to keep all the pieces in place, I stuck the wall to plain card. I coloured each brick with a mixture of red, orange, black, and brown watercolour pencils, then blended with a self-moistening brush.


I made a landscape stepper card from two A6 card blanks. I cut a wavy edged section of the 'mud' off to cover the short step and stuck in place. I put the remaining 'mud' onto the back step of the card. As the 'mud' is quite heavy, I added folded card bracing strips to the sides to make sure the card would stand up properly:


Finally I cut out sections of the brick wall and added these to the short step using foam pads, then added a selection of diggers etc and a greeting.


Thanks for visiting and happy crafting!

Amanda x


Tuesday, 16 September 2014

A shabby French tag

Hi everyone it’s Brenda from Bumblebees and Butterflies here today to share a tag I made using a quick distress ink background and the French Flight stamps and dies set.

P1180528
I started with the background using Victorian Velvet and Scattered Straw distress inks, smooshing them onto the heat mat and spritzing them with water. I laid a stencil into the inks lifted it and laid it on my tag transferring the colours and some of the pattern.
P1180521.jpgweb
I used the same colours to blend inks over the tag to create some more depth and I splattered with some walnut stain and frayed burlap inks to create some more interest.
P1180522web
At this point I had a good idea of the elements I wanted to add to the tag but hadn’t got the design yet in my head.
P1180526web
You’ll see the pen nib didn’t make it lol but I always mix and swap elements until I am happy with the composition.
P1180529
I added the tiny bicycle because I just thought it looked very French and added to the atmosphere of the theme, but also helped to ground everything and the piece of trellis framework behind the Eiffel Tower just seemed to help place it and give it some perspective.
P1180530
I also added some torn strips of tissue tape …..
P1180531
…. and the Fleur de Lys was inked, covered with glossy accents to give it some dimension and you can just see a smearing of Treasure Pewter on it. The seam binding was dipped in distress inks and wound three times round my fingers to make a fuller bow.
P1180532
Thanks for looking, I hope you are inspired to try out the background and the beautiful Framelits dies.

Till the next time.

hugs Brenda xxx