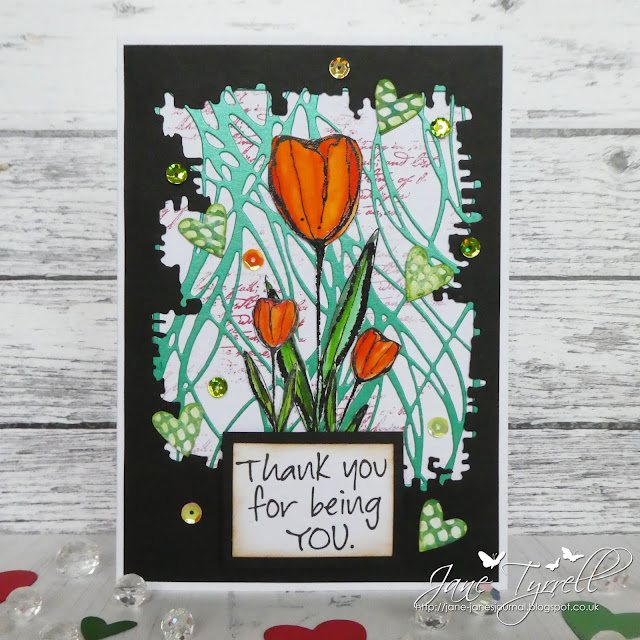
Friday, 20 February 2026

 Alice In Wonderland Slate Coasters

Good Morning Everyone, it's my turn to share my second Design Team Inspiration post for this months theme " Hearts " as hosted by the lovely DT member Cassie Campbell at Country View Crafts & Challenges. I am still in the process of moving house so my crafting supplies are not on hand & my second post is very simple but I have found my mini distress oxide pads and some stamps so fingers crossed, next month I may be able to get a bit inky. There is a £20 gift voucher prize for the winning entry and you can have up to 5 entries, although, you can share your creations as many times as you like. So we would love to see your take on the theme using products stocked by https://www.countryviewcrafts.co.uk/index.asp Don't forget if an item is out of stock on the website contact the lovely Brenda to see if she can order it in for you.
❤️❤️❤️❤️❤️❤️❤️❤️❤️❤️❤️❤️❤️❤️❤️❤️❤️❤️❤️


Thursday, 23 February 2023

Mixed Media Crafting Weekend with Stamperia's Very Own Antonis Tzanidakis

Last weekend we were giddy with excitement with the return of Antonis Tzanidakis to Country View Crafts.  The last time Antonis joined us was in 2019.  A weekend of face to face workshops had been planned for 2020 and due to the covid pandemic they were switched to webinars.


But, after a long drive back from Heathrow in rush hour traffic Antonis was back and raring to go!


Friday went off with a bang with the workshop attendees having a blast using Stamperia mediums and papers, including Antonis' own designs.


Layer after layer, medium after medium, the room was excited to get inky fingers and creative play time.


Saturday's project used Antonis' own designs.


Antonis shared lots more techniques


There were many gasps when Antonis demonstrated how to create an antique look by covering the whole project using antiquing paste.


There were lots of smiles at the end of the workshop.  I think everyone enjoyed themselves.


Sunday was the final day.  And the largest project of the weekend.  


Again, using some of the beautiful products from Antonis  and Stamperia, everyone got stuck in, fussy cutting, layering and aging their Geisha projects


Just look at those layers and textures.


And those beautiful papers.


Just look at those happy faces - it was certainly a fun day and the perfect end to a weekend of workshops.

And to top the weekend off, Antonis enjoyed a proper British Sunday roast!


It was truly a fabulous weekend at Country View Crafts.  For those of you lucky enough to attend a workshop with Antonis you will know that he is a wonderful teacher.  His enthusiasm, expertise and creativity shines through and he teaches so many exciting techniques, often challenging you to go outside of your comfort zone.

Don't leave it so long next time Antonis!

If you would like to attend a workshop with us visit our shop here.


Friday, 11 February 2022

February 2022 new Visible Image release

 Hi it's Jane here with a very quick post just to wet your appetite with the new Visible Image release which is out today and in stock over at Country View. (If anything is out of stock, just add your email address and Susan will contact you when she restocks.) Postage is FREE in the UK if your order is over £20

Do check out the whole of the release, there really is something for everyone from fun characters with co ordinating cutting dies, spring flower stamps, background stamps, stencils and awesome new layering dies. 

Here are just a few of my makes as I am lucky enough to also wear a DT hat for Visible Image. You can see lot more of my makes over on Instagram here.

Here is Sassy Molly with her co ordinating dies. I have also used the torn fishnet die cut into pieces and it also forms the aperture for this card. 


The awesome layering dies, these ones are Broken mesh and torn fishnet die 
More of the layering dies, Broken mesh and Framed fibres below.
There are new dies for the Wonderland stamps
and background stamps (this one is round in circles )and a cool brick stencil.

I blogged this one below for my CVChallenge post last week, this is a link to my post using the gorgeous new sketched tulips

Do check the whole release out here; there are lots more to see!

All the stamps are here

the stencils and dies are here

Back soon,

Bye for now,

Jane xx

Wednesday, 1 December 2021

New Wall Decals for my studio using the Cricut Maker 3

Hi friends, thanks for joining me today as I share how I made my wall decals for my studio. As with most of my designing I start with sketches on Procreate. I want very simple designs with clean lines to create a modern feel to flowers. Although my style is usually more shade and texture in my images for this project I wanted a flat image. The reason for this, is that the atmosphere in my studio is extremely important to my creative process, and so I wanted something bright and cheerful but I didn’t want my decor to interrupt my process or influence my creativity.


So in Procreate I started with an initial sketch

Once I was happy with the design I went over my design with an ink brush to get nice smooth lines 

And filled in the design as I wanted the whole image cut out


Once I was happy with the sketch (I decided to exclude the flower image which had fluted edges as I preferred the other for this project). I turned it into a finished design and exported it as a PNG file and opened it in Cricut's Design Space ( this is a dedicated programme to use with Cricut tools such as the Maker, Explore machines Mug Press etc.)


Once in the app I could refine the design by duplicating it for the amount I wanted. I resized some of the images to give variation, I also added some circles using Design Space tools (it has several shapes built in). I changed the colours of the files so that Design Space would sort the different coloured files into separate coloured vinyl. So for example, all the pink elements were grouped together so that once I fed the pink vinyl into the machine it would cut all the pink ones, and like wise the green ones etc.


I really like this feature as it simplifies the process so much. Once I was happy with all the settings I pressed make it. I have the new Maker 3 which uses smart materials and these do not need a cutting mat.
At this point the machine asks you what materials you are using and then tells you what blade to use. In this instance I was using smart vinyl which means I don't have to use a cutting and it also told me I needed the fine point blade which i loaded into my machine.


In the image below you can see my Maker vinyl tray and my blades


The adapter tray holds your rolls of vinyl and neatly fit onto the Maker. It guides your material in and gets it ready to cut. Once you press make it, the machine feeds the vinyl in measuring just how much you need, if you have enough for the project it then goes on to cut it, if not it tells you so you don't waste it and spoil your project. Once all the designs in each colour were cut the adapter has a cutting tool allowing you cut the roll of vinyl off so you again don't waste anything.


Next I weeded away the the edges of the vinyl leaving only the cut images.

I started to place my images on the walls using transfer sheets but realised that as the images were so large that I didn’t really need to use it and so just peeled them off the carrier sheets and then placed them where I wanted them.


I used removable Smart Vinyl from Cricut as if I want to remove them at a later date I can, but you can also get permanent vinyl which is more sticky.
Here’s some photos of the finished project.


I hope I have inspired you. The Cricut maker and materials can be purchased from Country View Crafts.

If you are interested I also have a post on how I transformed my studio with the decals being the final project

take care
hugs
Debsxx