Showing posts with label Eclectica. Show all posts

Wednesday, 6 April 2016

A Simple Thought

Hello all, Alison here from Words and Pictures with a simple card for you today.  I don't often create cards but, when I do, it seems that simplicity is often where I head for.


This was created with a piece of kraft card which I'd used to mop up leftover white gesso.  It then sat around for ages until one day when I had the Sara Naumann bird stamp set out and the two things just called to one another.


I kept it very simple with some Ground Espresso Distress stamping, clear embossed for extra impact, and then added a few extra twigs to balance the composition.


And what could I possibly use as a sentiment for such a simple card other than one of the Tim Holtz Simple Sayings?!


I layered up the kraft over some plain white card.  And on the inside, I created a complementary panel for sharing your thoughts with whoever you are sending it to.


I hope you like it (and the nice short post, for once!), and I'll see you again later in the month.

Alison x

Tuesday, 18 November 2014

Two quick stamped Christmas cards today….

Good morning folks!

Today I’m featuring Christmas cards using PaperArtsy stamps.  Following a recent PA workshop it’s renewed my passion for crafting with a brayer.  As these two cards are made in a similar way I thought I’d blog them together.


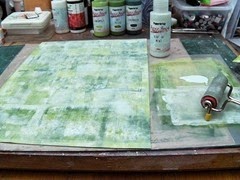
Both cards are quick and easy to make – they have to be as they’ve been made to go into my Charity card box.  Let’s start with the ‘DL’ Christmas tree card.  I picked the colour Frescos I wanted to brayer layer and they all went onto a piece of white card, one layer at a time.  I started with the darkest first and ended with the lightest.

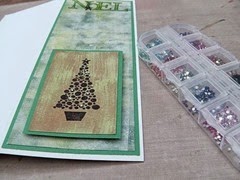
The background was cut, mounted and stuck to the card blank before stamping the ‘Noel’ onto it with black archival ink and colouring it with a sparkly glaze pen.  Next came a little kraft card, dry brushed with the lightest Fresco and then dried with a heat gun.  The tree was stamped with black AI then it was mounted and attached to the background with foam pads to lift it.  The last bit of decoration was to add some tiny crystals to the tree (for lights).


The background for the next card is a mix of colours rather than monochromatic.  It has been brayer layered in the same way, darkest to lightest.  (Fresco paints dry quite quickly, especially when being brayered, so they are a brilliant medium to use.)  Once finished, some contrast has been added by using a completely different and brighter colour paint with a small feature stamp and texture added by using white Fresco with a texture stamp.
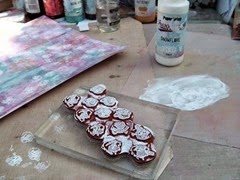


The strip of gifts across the front of the card has been created by masking.  The gifts were stamped onto green card and cut out to make the mask.  The gifts were stamped again onto the right side of a plain white card strip.  The mask was placed over the top and the border stamp stamped along each side with black Archival ink to create the decorative strip.  The gifts were coloured with coordinating coloured marker pens.  (Remember the rule, use alcohol pens to colour on water-based dye ink stamped images or vice-versa.)  Finally the sentiment was added and some Stickles Diamond glue.


There we are, two simple stamped cards for quick card-making.

Thanks for stopping by, have a lovely day!

Chris xxx


Saturday, 20 September 2014

Secret garden poppies…

I was lucky enough to attend a PaperArtsy training day recently with some of our DT and it’s completely re-awakened my love of stencilling. Today’s project is fairly simple but very effective…


I starting with a square of white card, a brayer and autumnal coloured PaperArtsy Fresco paints of Toffee, Butternut, Haystack and Smoked paprika to make the background:


This stamp of Lin Brown's makes a gorgeous background feature when stamped with Snowflake Fresco:

Layered texturing has been created with these Ellen Vargo stamps and theFresco paints to get this result:


The background so far, mounted:

A scrap of cardboard packaging painted with Haystack Fresco makes a great base for the stencil:

Hey pesto Fresco has been stippled through the stencil and allowed to dry. Then the poppy pods are added using the Smoked paprika. That too has to dry before adding the shading of Claret Fresco:


Having decided that the feature would be set to the left of the card, I used the stencil text to add a focal point bottom right using black DI applied with a blending tool:

Card centre:

Text:

Left focal point:

Complete:


A big thank you to Susan for inviting us to go and to Leandra, Lin and Jo for a fab, fun day!

If you haven't done any stencilling recently folks get them out, dust them off and see what you can do - great fun! >:o)

Thanks for stopping by, have a great day!

Chris xxx