Monday 28 August 2017

Emboss resist journal panel

Hi  - it's Brenda with you again today and I am finishing the month continuing the blues and greens challenge theme with another technique and journal panel.


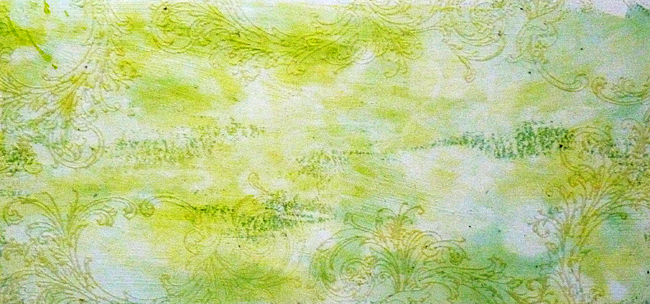
Paint a coat of white gesso over a piece of card then paint a watery wash of green gold and dab most of it off with a piece of kitchen towel, then repeat with a watery wash of phthalo blue.
Stamp and clear emboss with a patterned stamp.


Dip, drip and dry watery layers of blue and green acrylic paints. (I mixed my own using prussian blue hue, phthalo blue, titanium white and diarylide yellow). Try not to melt the embossing but at the same time just as it's cooling rub with a babywipe and kitchen roll over the raised shiny areas to wipe any paint from the design and keep it showing through. Note - do not rub too hard unless it's cooled right off.


Dabble over some white watery paint to knock it back a little and add more colour dipped or dabbles if needed....


Randomly splatter some white and blue watery washes to create some depth of colours and add a little light text stamping in cornflower blue archival.......


..... and because I like to vintage and mute the brighter colours in my palette I added a tinted glaze made up of ultra matte varnish and paynes grey paint.


I hope you have enjoyed the challenge theme this month. If you'd like to see how I finished off this background then pease pop over to Bumblebees and Butterflies for more details.

Thanks for stopping by.

hugs Brenda xxx


Saturday 26 August 2017

Guest Designer Project - Debbie Maybank

 Hi Everyone

 
Today we have a project created by Debbie Maybank using the Sizzix Eileen Hull Journal Die


I wanted to share with you my journal I created for my daughter, who just got engaged. I made it for her to use as a wedding planner. She loved it! 

Here are the signatures.
 
The first picture is a flap/pocket for receipts, business cards etc.


 I love this die, I have plans to make many more...

Debbie x

Thank you for sharing this gorgeous project Debbie

Tuesday 22 August 2017

Forgotten the words

I recently bought a new Dylusions a small Creative Flip Journal. This page was one of my first experiments in it!
I started by spraying the pages with Fresh Lime (my very favourite colour!)
Then I added areas of Calypso Teal and used some kitchen roll to mop up the ink
Next I added some diamonds using a stencil and Slate Grey ink. Again I used kitchen roll to mop up the ink.
Finally I added some Picket Fence through an alphabet stencil
Using a leaf stencil I added Dirty Martini ink (decanted into a water brush). I wasn't super careful as I wanted the ink to bleed a little under the stencil as it looks like watercolour. When the ink was dry I used a black pen to drawn the leaves in. Notice how the green ink highlights the Picket Fence beneath - gives your leaves a really lovely extra detail
I added some tape for my Zini to stand on and stamped the Zini on the page and on some white card. There are some lovely details on the stamp that would be really difficult to cut out so if you stamp the image on the page then you don't have to worry about those additional details!
Then it's a matter of adding the extra images and sentiment. The arrows are from this Emma Godfrey for PaperArsty set and the spider is from this one. The bird is from an Elenazinski set.
The birds on this page are from these stamps sets (Set 5 and Set 8). The text stamps are from the Emma Godfrey set above. A few white paint circles and Black and Gold lines using an old lid and gift card.
I hope you like the journal pages. I love making them!

Friday 18 August 2017

Mixed Media Layers

Hi it's Brenda here with a mixed media background and I'm still using the colours of the challenge theme for this month. You can find that here if you would like to enter it.

Begin by covering a piece of card with tissue wrap, decoupage paper or stamped tissue paper, (I chose to stamp my own design on tissue paper), adhere it with decoupage and when dry sand the edges to get it to size rather than cut it with scissors.


Scrape white gesso over the surface with a piece of plastic card or palette knife.


Paint painty layers of washes through the gesso and dry each layer before adding the next. By painting the washes you have complete control as to where they go on the substrate, the thickness of the paint and you can dab areas off with kitchen roll. This is so different to the dip, drip and dabble techniques I often use.


Take a little white gesso and a blending tool and foam and then apply through a stencil - dry.


Make up a 'dirty wash' using pin point amounts of paynes grey, phthalo turquoise and raw umber paints with plenty of water ....


  ...... and paint it over the surface and you will see how it immediately tones down the white gesso.


Mix some white crackle paste with some of the paints (I created a light blue and a light green) and taking the same stencil apply it over some of the clocks already.
 there. After it dries you will see the cracks appear.


To help the cracks show make a wash of raw umber and apply it lightly over the clocks and see the cracks appear and also create a more grungy appearance.


This is now ready to use for a journal pane or card background.

I will be using this for a journal page, if you would like to see how it is finished please pop over to Bumblebees and Butterflies where I have completed it ready to be inserted into the new journal when it's finished.

Thanks for stopping by today.

hugs Brenda xxx


Monday 14 August 2017

Card with PaperArtsy Zinski stamp

Hello everybody, it's Monika here.

When I first saw the PaperArtsy Zinski stamp (ZA13) I knew I needed that. 
First I have made a card with a lovely creature/fairy/girl (whatever you like) from this set.


The basic card was cut out from a fuchsia cardstock with Sizzix Framelits die (658610).
The top was cut out from a white watercolour paper with a one size smaller rectangle die and I painted pink with DecoArt Poodleskirt Pink.


After drying I tapped watered white acrylic paint onto the pink card and I also spritzed with water.


Then I stamped circles with one of the stamps of the PaperArtsy EEG24 stamp set and heat embossed with white embossing powder.

As for the fairy... I stamped with Ranger Archival Jet Black stamp and after I used clear embossing powder.
I coloured the fairy with Ranger Distress Markers (Tumbled Glass, Cracked Pistachio, Picked Raspberry) and Zig Clean Markers (Flesh Colour, Blush).


The text (EEG18) was stamped with Ranger Archival Jet Black ink then I added clear embossing powder.
I cut it out with scissors irregularly and I glued onto the card.


I hope you like it! Happy crafting!