Showing posts with label Dylusions. Show all posts

Saturday, 28 April 2018

We can't all be kings!

Hello! I found a fabulous quotation and wanted to make a quick journal page to use it! I sprayed Fresh Lime and Cut Grass ink sprays. I then used a stencil and sprayed water and let it dry.
I added a number stamp and a dots stamp in Shabby Shutters to complete the background.
I stamped out three circles, a border and a crown and used Shabby Shutters to colour them. I left the crown uncoloured to stand out in the final piece.
I added the pieces to the page along with a Paper Doll. I typed the quotation We can't all be kings...someone has to clap when I walk by on my trusty typewriter and cut them out. The circled then become bullet points.
I hope you find a quotation that inspires you to make art.
Gabrielle x

Saturday, 31 March 2018

Final Postcard ideas

Hello! It's the last day to enter the Postcard challenge on our challenge blog and in case you need some final, speedy inspiration I have three quick ideas you can use. Each postcard took less than 30 minutes so you'll have an entry in no time! There is some typing on each postcard - I have an old typewriter that I used but you could use a sentiment stamp or alphabet stamps for your sentiment.
Let's take each one in turn!
For this postcard, add paint to the postcard for the background (I used Bubblegum Pink and Vibrant Turquoise) and then added White Linen, Lemon Zest and Black Marble paint through some stencils. It really doesn't matter if it looks messy - you'll cover it up!
Then stamp your images - I coloured in a few areas so the white was a counterbalance to the crazy background! When it was assembled I drew some lines from the shape to the scalloped edge so that they look like they are hanging.
The second postcard features a flamingo from Dylusions. The heart is from the Creative Dyary Stamp Set 2.
I used Distress Inks (Broken China, Shabby Shutters, Gathered Twigs) for the background and leaf stamps - the centre of the leaf stamp was inked with Dylusions Fresh Lime ink.
A tip for difficult to cut out images... cut across an area that you can easily glue back together - I regularly cut off the heads from stamped images!
For the third, and final idea I sprayed a stencil with Vibrant Turquoise and then covered the card with Gathered Twigs Distress Ink to give it a vintage colour palette. I then stamped lots of images on the background from an old Tim Holtz set. Then I stamped lots of Darcy for PaperArtsy images on card and coloured them in.
I hope you join in with this month's challenge!
Gabrielle

Thursday, 26 October 2017

October Dyary Page

I am very much enjoying creating a weekly page in my Creative Dyary. I don't get as much time as I'd like to to be creative each week (working full time gets in the way!) however ensuring I do something creative at least once a week is very satisfying! The Dyary has a week planned out on the left page Monday to Sunday but there are no preset dates/months so you can start your Dyary at any time. I started mine in February and haven't missed a week! On the right side, some pages are preprinted with black and white drawings, some with coloured backgrounds. Here I've adapted one of the coloured backgrounds.
The backgrounds are pretty fabulous and really need very little work but of course I just can't help myself...! This was the background before I meddled!
Add Lemon Zest and Bubblegum paint to the page through a number stencil and then Squeezed Orange through a dots stencil.
Dylusions have bought out a fab set of background stamps where you get a stencil and a matching stamp. There are leaves, brickwork and cobwebs in either 9 or 12 inches to match your projects.The idea is to stencil the background and the stamp the detail in the foreground. Now, it's a terrific idea but don't feel limited to use these in one way - you can try this idea! Lay the 9" leaf stencil upside down and the wrong way round (so the word 'front' is showing like in the picture)
Use Fresh Lime paint through the stencil - try to have different lengths of leaves to create a bit of interest.
I drew round the leaves roughly in white ink, but of course you could use black!
Then, using the bottom portion of the leaf stamp, add some leaves in black ink.
Using Black Marble ink in a water brush, colour in the stamped leaves.
I added some stamped details from this fabulous Zinski Art set. I stamp the larger images because there are details that are hard to cut out! 
This is the finished page with a small sentiment from a terrific Emma Godfrey Halloween set.
Thank you, as always for joining me! If you'd like to see more of the Dyary pages I've created this year - please click here.
Gabrielle x

Thursday, 12 October 2017

Create art every day

I wanted to decorate the cover of my small Creative Flip Journal and thought I'd share what I did!
I started by masking off the red binder with some washi tape and painting it three layers of Black Marble paint
I then added Snowflake (white) paint with an old gift card
Next came Calypso Teal paint
Now for the fun part! Add more white paint through a stencil with Cut-N-Dry foam - this is so the next colours zing! Then add Banana paint over the centre of the flowers
Reposition the stencil and add Bougainvillea to the tips - how cool is this?!
Add some dots from the stencil on to the flowers (clever how they fit together!) with black paint
To complete the background I dried the flowers and the sanded it down so it looked more shabby. I added some Gathered Twigs Distress Ink to the edges
A tag and some flowers from JOFY for PaperArtsy completed the cover.
Thank you, as always, for popping by

Thursday, 14 September 2017

Spooky

With the start of September and more Autumnal weather, my thoughts have turned towards Halloween and using the Halloween themed stash I have. I try not to limit Halloween or Christmas goodies to just those holidays because it seems a waste to leave them sitting on the shelf for a year but inevitably we do. So, time for me to dust them off and ink them up!
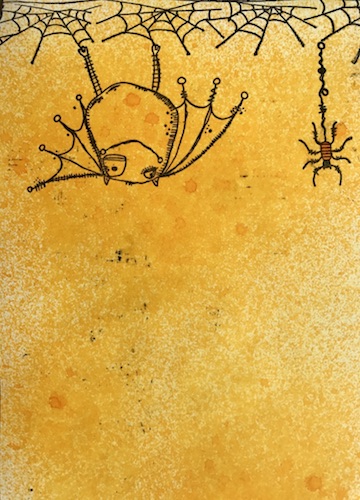
I started by spraying a page in my Small Creative Flip Journal with Pure Sunshine ink. I love this colour!
I then added a border for the bat  and spider to hang from. The spider's body was coloured with Squeezed Orange ink decanted into a water brush. By stamping the bat on the page you retain all of the little details that would be really difficult to cut out. I also stamped him (and the chap from the stamps set) on card to colour and cut out.
I then added some Speckles using Black Soot Distress Ink.
I stamped out some accessories and die cut them. I should have coloured them before cutting them out (which is what I usually do) as the broomstick in particular felt very delicate! Always learning!
The sentiment was stamped with alphabet stamps (I LOVE these!) and some additional word stamps by Emma Godfrey. The washi tape is from the Aristocrat set. Some white circles (made with an old lid) and gold painty lines finished the page off.
Hope you feel like dusting off your seasonal stamps too!

Friday, 26 May 2017

This is Art

I am really enjoying adding pages to my journal that I'm just letting happen without planning them out beforehand. I tend to grab the nearest paints, inks and stamps to hand and just see what happens!
My favourite colour combination is Bourgainvillea and Beach Hut with Snowflake so those were the nearest paint colours! I started by putting my favourite pink on the page (the tape is there to protect the opposite page) with some white paint using a paintbrush:
Using an old gift card I put more pink and white on in a random pattern. The colour looks different thanks to sun going in and out on a very cloudy day!
I added blue through a stencil:
Then I added all the stamping to the page using Everything Art 03 for the main images and Zinski Art 01 for the chains. I stamped the large circle and two paintbrushes on some card and coloured them in.
As a final flourish I added a sentiment to the bottom of the page (highlighted in white pen). To make the sentiment, I build up the words on an acrylic block so I know they will fit before I stamp them. Remember to build the word backwards! I used Everything Art 05 - I LOVE this alphabet!
And that is that! I hope you like my journal page - do share your pages made with what you have to hand!

Wednesday, 26 April 2017

A little birdie

I am thrilled to share a page in my Dylusions Journal. I wanted to use a tag as the central image and to create a background that was complementary but the reverse... I hope that makes sense!
I used an old store card to spread paint on a tag.
Then I sanded the tag and added some brown Distress Ink.
I forgot to take a photo of the next stage of the tag but I did the same on the journal page! After putting paint on the page (as before) I added the darker colour through a stencil. When dry I added white over the top and then sanding when dry.  
Then I added a little stamping to the tag and it's complete! The stamps I used were Zinski Art for PaperArtsy - ZA05, ZA07 and ZA08
Thank you, as always, for popping by.

Thursday, 20 October 2016

Going crazy with colour.....

Scribbly Birds Journal - Dylusions Paint
Hi everyone and welcome to my final project for the CVC project blog. I am leaving the team at the end of October after two great years! 

So for my final project I have gone a little crazy with colour in my journal using a combination of Dylusions and Dina Wakley paints. The background was created by painting in patches with a combination of a brush and my fingers - no great plan... just adding the blue / yellow / green in various places. 
I then added some white paint with a credit card and also through a layering stencil (Splotches.) I also added some background stamping in archival ink.
I die cut some scribbles and splats in white card and sponged some  of the same colours on them adding a little black archival to contrast.
I took a piece of thinner white card and lightly brushed with purple and blue paints - intentionally keeping it light and patchy. Once dry and stamped the scribbly birds and fussy cut.
Scribbly Birds Journal - Dylusions Paint
A quote and some doodling around the page edges finished my page!

I hope you like it!
Nikki