
Initial Birthdays
My little boy has just turned a year old (eek!), so I’ve had a few first birthday cards to make for babies we know from our local children’s centre. I really love all the patriotic collections released for the jubilee and Olympics, and thought it would be lovely to use some for these first birthdays, as turning one in such a special year will be something to talk about when they’re older. I picked the London Line collection for my projects, as I love the pastel shades and lovely watercolour style for babies, and it’s cute without being sickly.
My two favourite types of cards when I was little were shaped ones and ones with age badges. One year olds are a bit young for badges, so I made my cards in the shape of each child’s initial. The design is suitable for any age, so to turn these into badge cards, just make the number with two thicknesses of card (so it’s sturdier), attach a safety pin to the back with silicone glue and attach it to the card with removable glue.
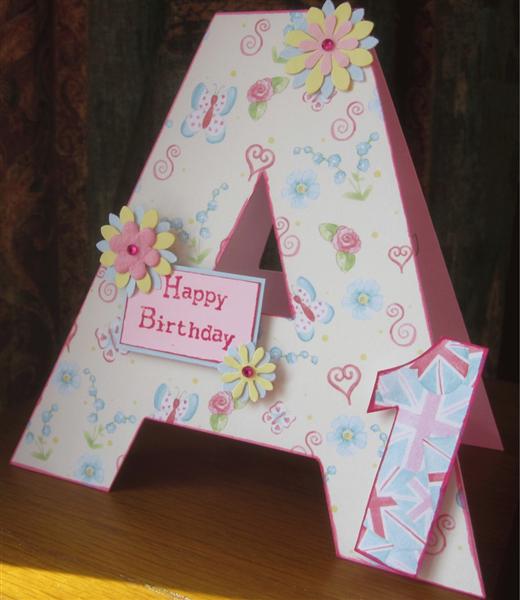
1. Cut the first letter of the child’s name from a card blank, making sure it’s nice and chunky (4 or 5cm wide is nice), so you have something big enough to decorate, and that you have a bit of the card fold remaining. I made mine for Ava and Evie: I used a 13.5cm square card blank with the fold at the top for the ‘A’, and a portrait A6 card blank for the ‘E’.
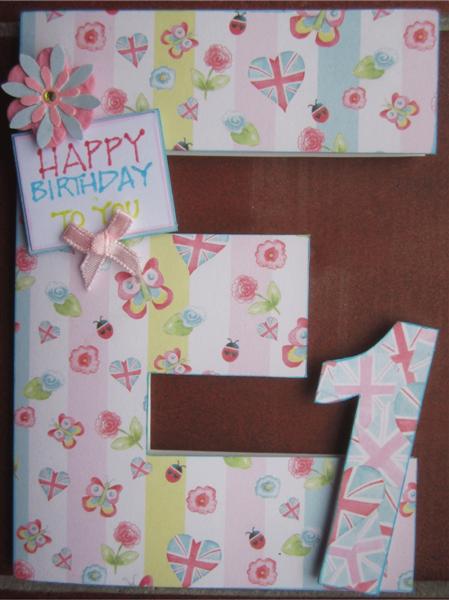
2. Die cut or stamp and cut out a number for the child’s age. Cover the card and number with coordinating papers from the London Line 8x8 paper pack and ink the edges with a pen or ink pad.
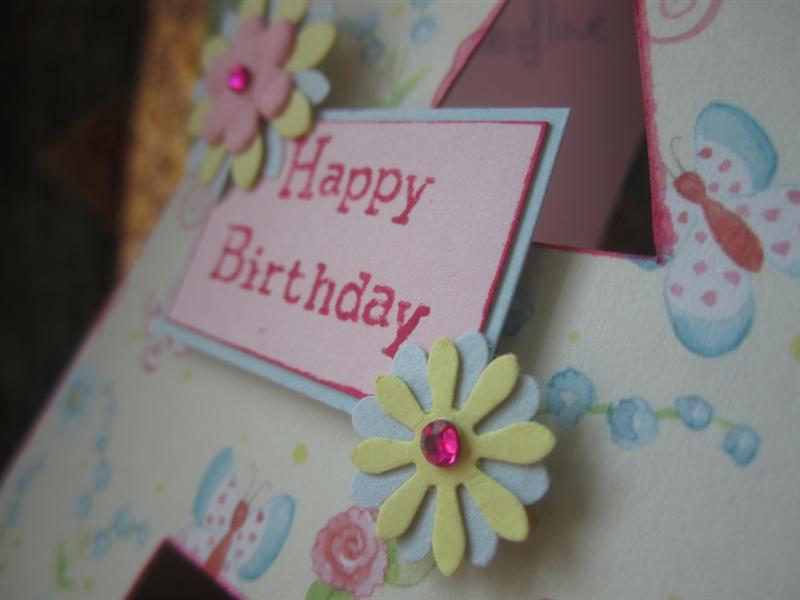
3. Stamp a greeting in matching inks and mat with coordinating card. Attach the number and greeting to the card with 3D foam pads (or removable glue, see above). Embellish with bows, punched or die cut flowers, and gems.
Tips and Ideas
• To avoid cutting too far when cutting internal corners (like the triangle in an ‘A’), pierce the corners with a pin or pokey tool first. You’ll feel the hole with your knife and be able to make a more accurate cut.
• Pick two or three colours from your papers and add embellishments in just these colours to get a great match without fussiness.
• Use coloured pens to stamp greetings with multiple words or lines to create a perfect multi-colour match with the colours in your paper. To get this effect without stamping, colour peel-off greetings with permanent markers.
• For simple and economical embellishments, punch or die cut flowers in your three main colours and layer up. This is a great way of using up card or paper offcuts. For some girly shimmer, spray with Perfect Pearls Mist.
Shopping list:
London Line 8x8 paper pack
Card blank (A6, square, or tall depending upon the letter)
Large number stamp or die
Coloured pens or inks
Flower punches or dies
Happy birthday stamp
Coordinating card.
London Line 8x8 paper pack
Card blank (A6, square, or tall depending upon the letter)
Large number stamp or die
Coloured pens or inks
Flower punches or dies
Happy birthday stamp
Coordinating card.
No comments:
Post a Comment