Thursday, 15 August 2013

Tag Book

Thank you for your good wishes following my accident - I'm on the mend though I've been "reassured" I'll take months to heal and so, for the foreseeable future I'm crafting one handed! For my first project back I wanted to make a tag book and this is it! Each page is coloured with Dylusions Inks and stencils with a mixture of Dylusion, Tim HoltzWendy Vecchi and JoFy stamps. I apologise that there's a few photos... I couldn't decide what I could leave out!
January, March, May
Each page is edged with Vintage Photo Distress Ink so there is a complementary feel as you look through the book.
February, April, June
The month name and phrases are typed on my laptop and printed out, before being edged in Vintage Photo.
July, September, November
To colour in the under sea animals I used water brushes filled with Dylusions Inks.
August, October, December
For the cover I used Tim Holtz Idea-Ology and Wendy Vecchi Art Parts which take Dylusions Inks beautifully! The binder is wonderful Ruler Binder kit with a little Vintage Photo ink added to knock back the 'just out of the packaging' look!
I hope you like my tag book and that you feel inspired to have a go yourself - if you add a quotation or saying you could enter it into this month's Country View Crafts challenge... Just saying! Oh! To prempt the question which are my favourite pages...!!!

Wednesday, 14 August 2013

Krafting Kidz #5 - Paris poodle

Here’s a card that the kids will have fun making for Mum, Gran, Nan, an aunt or any other female they want to give a card to.


The poodle has been cut using the Sizzix Poodle Bigz die and the Eiffel Tower from the Sizzix/Tim Holtz Fleur de Lis and Eiffel Tower Bigz die. (You can use the Marianne Craftables Eiffel Tower die or a chipboard shape instead if you have them.) The colouring has been done with Distress ink pads - Black soot and Victorian velvet (Spun sugar is just as good).
 

Although I’ve added a chain strap to the handbag this can be left off as just a clutch bag if your children are too young to be handing wire cutters and pliers.


As there is a little more for the kids to do for this card we have instructions that you can view/print/download HERE.

Have fun kids!

Chris xxx

Monday, 12 August 2013

Yellow & white

I needed to make a quick card for a friend who wasn’t feeling very well and had to grab what was closest to hand. A I didn’t have much time I kept it simple by making all the embellishments white.


Having laid a bordered mat on the card I then used a scroll die and Spellbinders labels dies to mount the feature dies upon.


Marianne Butterfly die Marianne Leaves die Spellbinders Fantastic flourish two

Because the rose added too much depth for the card to be put in an envelope I ended up having to make a box so I made a quick slot box for it from coordinating yellow card.


What would we do without dies? lol Have a great week and thanks for stopping by,

Chris xxx

Friday, 9 August 2013

Soldier, soldier…

It’s a long time ago since I was at school but I do remember that we had ‘Rough books’ – does anyone else remember those? Well, it’s something I still have around today, I always have a little notebook of some kind near me to scribble down the things I need to remember such as shopping items. I’m coming to the end of my current one which is a bit too small for writing anything meaningful in it so I wanted a larger one. The new one has been covered and when I finished it I thought it’d make a brilliant little gift for a guy so I made another using the brilliant TH Toy soldier die to make the soldier on the front…


I’ve used the Spellbinders Moroccan Accents border and corners dies to decorate the edges and the book title label was made using Spellbinders’ Labels four dies. There are pockets on the inside which would be great for a timetable or other notes…


I used one of the dies from the Spellbinders’ Grand Stately Circles  to cut the inside book cover. The brown, slim pocket is thin kraft card embossed using one of the new Crafts-Too A4 embossing folders (3 Fold birdie) which has been  distressed using a Vintage photo ink pad. You can slip larger notes on the inside and tickets, business cards or small notes in the slimmer pocket. This is repeated on the inside of the back cover too.

The soldier is so easy to make, you can give him depth simply by cutting him from an old cardboard box if you don’t have mountboard or greyboard to hand. A little bit of paint here and there and he’s done – yet another Christmas die that can be used all year around and great for the guys!


Thanks for stopping by, please leave a comment if you have the time. Enjoy your crafting,

Chris xxx

Wednesday, 7 August 2013

Krafting Kidz #4–Flower Burst card

This simple but pretty card is a great one for the kids, all it requires is a card blank, some coloured card, patterned backing paper (any), a short piece of ribbon and the lovely Spellbinders D-Lites Flower Burst die


I’ve  added a few craft gems to lift the cream card a little…


The card works equally as well with the D-Lites Flower Box die too.

This is a simple but elegant card that will take the kids time enough to make to give you a well earned break.

More soon, thanks for stopping by,

Chris xxx
S2-007 Spellbinders™ Shapeabilities® Die D-Lites™ - Flower Burst
s2-025-spellbinders-shapeabilities-die-d-lites-flower-box-21649-p[ekm]250x250[ekm]

Monday, 5 August 2013

A project from Trace

Trace, of inkypinkycraft  is one of our talented permanent designers on our challenge site. Today she is kindly sharing one of her fabulous projects with us here, it's a gift tag gift card holder - so over to Trace...


 I have been playing with the tag die and also the fab and very versatile ATC die. This make is a gift tag , that has a pocket on the back to take a gift card, made using the ATC. These are great for all occasions and can easily be added to a parcel or the neck of a bottle.

I coloured the tag front and back using the fab distress paints, these can be splodged onto a craft sheet and then spritzed. drag the tag through then dry with a heat tool. Once dry these can be re-wet but do not react with the water...meaning you can layer distress inks and re wet to your hearts content!

The image itself is from the fab Time Travellers set drawn by The talented Brett  Weldele. I stamped in black archival ink and then used a waterbrush to add colour using distress ink from my craft sheet.


On the back of the tag I coloured a mini envelope and then die cut two ATC's which I coloured and glued back to back.

This make was made for a special thank you to my son's teacher and contained a voucher code on the gift card. These are easy to make to suit any taste or style and a nice way to give a gift card, you could even include a pre-bought gift card in the pocket.


Hope you like the make, have a fun and inky day! 
Trace  x


Saturday, 3 August 2013

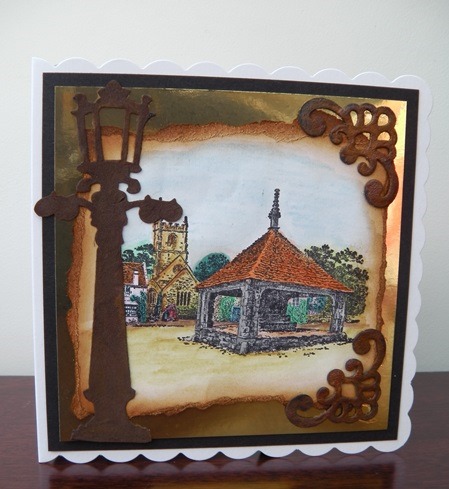
Using the lamp post die

I love the Tim Holtz holiday lamp post die! Although it has holly on it, it is completely separate to the lamp post itself which means it can be used all year through. It’s fabulous for using as a foreground focus to push a landscape stamp into the background…


I cut this one out of thick black card and ‘rusted’ it with rusting powder…


I rusted the corners too, for balance…


The corners are made in the same way using the corner dies from the Spellbinders’ Moroccan Accents set.

More on Monday when we have a surprise guest. Have a great weekend,

Chris xxx