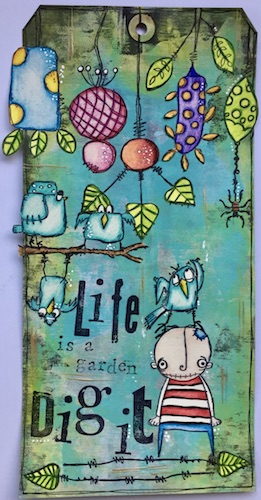
Hello! This is my second project using the new Elenazinski stamps. My first project was here. I loved the bird standing on the chap's head on my first project so I couldn't help repeating that here with a different chap!
I started by taking a giant black tag and adding Snowflake paint with a brayer.
Then I added a thin layer of Caribbean Sea again with the brayer
With my finger I added Banana around the edges of the tag
Then I stamped all my images on the tag so I knew where they'd be placed but also so I didn't have to cut out all the little details. I used ZA02, ZA05, ZA06, ZA07, ZA08 and the rather fab new alphabet stamps. The eagle eyed will notice there are no birds on the branch. I'll explain why later!
To stamp the letters, I space them on my acrylic block and check they fit before inking them and adding them to the tag.
When I stamped each image on the tag I also stamped it onto card. It's these images I coloured in. The pink and blue splodges are when I clean my blending pencil!
The birds were missing originally from the tag because I wanted to stamp them so their feet were placed on the branch (which hadn't been coloured in yet!) And apart from some gold paint on the edge of an old gift card, a little white pen and a black pen border that's it!
Thank you, as always, for popping by
Wednesday, 22 March 2017
Thursday, 16 March 2017
Make A Wish
So when all my ideology goodies arrived from the lovely Susan ... including my eagerly awaited paper dolls, and boy I was not disappointed they are gorgeous!! I found a few stolen moments to play..and here are the results :
I created this card using a distress oxide background and then added some flowers from the new botanical paperie - which is crammed full of gorgeous elements to add to cards and or mixed media, collage and just so many to choose..and of course a paper doll - there are 107 to choose from in all sorts of sizes and they're all gorgeous ...
I also used some of the new tape and one of the quote chips...so here is how ...
In my previous card found here I applied the distress oxides to the craft sheet , but for this card I applied onto the card ( as with regular distress ) using mini blending tools. I then spritzed with lots of water , using the distress spritzer gives you the combination of fine mist and bigger droplets..and heated.
To intensify the colours I re-applied ink over the top and the distress oxides allow for colours to layer over darker colours - truly amazing...and more water makes even more magic happen.. You can carry on until happy with the background .
Now for even more distress magic, because like regular distress they react with water , I placed down my flourish stencil (032) and then applied water using a blending tool through parts of the stencil using a moist piece of blending foam on the tool
see how it magically removes the water through the stencil leaving a soft impression on the design- I then heat set this .
I added some design tape from the aristocrat set in the corners for added detail....
Now it is all about those added details ...I sanded the edges of my paper doll and added a touch of distress (ground espresso - regular distress) I also cut a flower image in half, sanded and inked.
and here is the finished card ...
Here you can see the texture light sanding gives and it allows ink to be easily added around the edges.
I added some seam binding - which I dyed with regular distress in wilted violet
And look at the wonderful dimension the quote chip adds - I sanded mine and added a touch of ink.
So there you have my make ...using lots of new goodies and some stolen playtime...
hope you like it ..and I will be back as and when playtime allows .
trace x
Labels:
botanicals,
distress oxides,
Idea-Ology,
paper dolls,
Tim Holtz,
Trace
Tuesday, 14 March 2017
Egg shaped Easter card by Tim Holtz
Hello everybody, it's Monika again!
I'm trying to make a few Easter cards before the holiday, so here is one of them.
And here is my step by step tutorial.
I cut out a large egg shaped card with Sizzix die from kraft paper.
Then a one size smaller from watercolour paper.
With white ink I stamped Tim's wildflowers onto the watercolour paper and sprinkled with white embossing powder.
With my heat tool I melted the embossing powder then I started to colour the egg with Distress inks and a sponge.
I spritzed with water and white the edge with Picked Fence paint.
From watercolour paper I cut out the butterflies with Tim's Sizzlits die and coloured with Distress markers. Then with a wet brush I blended the colours.
I'm sorry, I forgot to take pictures about the rabbit. But first of all, I have to tell you that it was a wood mounted stamp before. But since I got my Misti Stamping tool I have transformed all my wood mounted stamp into a cling mounted stamp :-) So in this case I used my Misti and I stamped Tim's rabbit with Archival ink (Potting Soil) and after I put and melted clear embossing powder on it. I coloured with Distress markers.
I glued all the elements and then added chit chat stickers.
What I used:
kraft paper
watercolour paper
Sizzix Framelits Die, Eggs
Stampers Anonymous, wood mounted Easter Rabbit by Tim Holtz
Ranger embossing powders (Weathered White, Clear)
Ranger Distress markers
I hope you like it! Happy crafting!
Wednesday, 8 March 2017
Just Taller
Hello! It's my privilege to be featured on this blog today and I have the first of two projects featuring the latest Elenazinski stamps from PaperArtsy.
I started by putting Pewter paint on my page and then A Bit Jaded Infusions. I forgot to take a photo of this step but I do this pretty often so luckily there's a post here that shows this process!
Working quickly before the Infusions were full dry, I used a baby wipe to remove some of the colour through a stencil. The effect is very subtle so you could skip this stage!
The hanging plants would normally be the stamped on the bottom of the page so they grow upwards. Who likes normal?! I like to mix things up and to use stamps more creativity because that way they have lots of uses. To save having to cut out all the details I like to stamp onto my project. This is what my layout looked like. I used ZA04, ZA06 and ZA08.
As I stamp on the page I also stamp each image on card so I can colour this image in and cut it out.
I made this project on a very cold day earlier this year and I was so cold in my Studio that I bought the card into the house and coloured them in the warmth! Then just cut them out and adhere them to the page.
The left hand page looked this this when finished. I used the edge of an old gift card to add a little gold paint to the page as a finishing touch.
The right hand page looked like this:
Thank you, as aways, for joining in with me today - I hope you like my project!
I started by putting Pewter paint on my page and then A Bit Jaded Infusions. I forgot to take a photo of this step but I do this pretty often so luckily there's a post here that shows this process!
Working quickly before the Infusions were full dry, I used a baby wipe to remove some of the colour through a stencil. The effect is very subtle so you could skip this stage!
As I stamp on the page I also stamp each image on card so I can colour this image in and cut it out.
I made this project on a very cold day earlier this year and I was so cold in my Studio that I bought the card into the house and coloured them in the warmth! Then just cut them out and adhere them to the page.
The left hand page looked this this when finished. I used the edge of an old gift card to add a little gold paint to the page as a finishing touch.
The right hand page looked like this:
Thank you, as aways, for joining in with me today - I hope you like my project!
Thursday, 2 March 2017
explore, dream, discover
So here is the result , and a card too :
I started by applying texture paste through the flourish stencil in both corners of the card and left to dry . I then applied the inks to the craft sheet ( sorry so excited I forgot the picture ) - spritzed and then dipped the card and dragged through. I then heat set, spritzed and re dipped , the more you spritz the more the distress oxide magic appears...
they're amazing!!
I wanted to use the same inks to colour the bird stamp, but know that you shouldn't drag one colour distress oxide through the other as to try not to contaminate the pads ...so I inked the bird stamp with broken china and then applied the vintage photo ink using a blending tool , to get a double coloured image.
I spritzed the bird image and dried and then spritzed and dried again...the oxidized effect
gets greater the more water you add ...it is truly amazing!!
Here are some of the close ups
To allow the bird to stand out I glued some bits of mdf on the back as this raises it up.
I finished the card off with some hand dyed seam binding...( used distress inks for these ).
I added a word band and coloured the letters using distress crayons in tumbled glass and frayed burlap.
I added a chit chat sticker, with inked edges and added to the right hand side
I love these colours and the distress oxides are just amazing - cannot wait to play some more.
So hope you like my first foray into distress oxides ...
trace x
Labels:
card,
distress crayons,
distress oxides,
Texture Paste,
Tim Holtz,
Trace
Tuesday, 28 February 2017
Easter tag with Tim Holtz crazy bird
Hello Everybody,
It's Monika here with my second post.
This time I have brought you an Easter tag.
This:
And here is my step by step tutorial.
1. I cut out a bigger tag with Sizzix Framelits Tag die by Paula Pacual (658611) from kraft paper.
2. I stamped Tim Holtz background stamp on white cardstock with using Misti Stamping Tool.
3. I covered the stamped image with Ranger Clear embossing powder.
4. I put back the excess to the jar.
5. I heated the embossing powder on the stamped image.
6. I made it twice.
7. I cut out two one size smaller tags from my stamped cardstocks.
8. I inked the edges with Ranger Distress Gathered Twigs and glued the smaller tags on the big one (both sides).
9. I inked with green Distress inks a white watercolour paper and cut out the greens.
10. I placed and glued them on the tag.
11. I stamped the crazy bird and the bunny ears onto a watercolour paper with black Ranger Arcival ink.
12. I coloured them with watercolour technique using Ranger Distress markers.
13. I prepared many layered flowers a few months ago but I didn't use them, so I could just take three form my stash.
14. I placed and glued all the elements on the tag.
Supply list:
Sizzix Framelits Die, Tags by Paula Pascual (658611)
Stampers Anonymous, Bird Crazy by Tim Holtz (CMS212)
Ranger embossing powder, clear
I hope you like it! Happy crafting!
Subscribe to:
Posts (Atom)


