
Hello Everyone - Jennie here today with something a little different from my normal style.
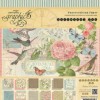
I don't know about you but I got a bit of a shock at the cost of posting some of my handmade Christmas cards this year (you all know how I love to adorn my cards with my handmade flowers!) but more to the point was worried that they would arrive safely. This was in my mind whilst I was looking at the bits and pieces of scraps I still have left from my Graphic 45 Botanical Tea paper stack and I thought I would make a few layered cards which I felt I could safely post to friends in Europe. However it was quite hard to force myself to think "flat"!
I started by sorting out all my scraps into colours - I was amazed how much I still had.

Then I started layering bits and pieces (previously punched borders, fussy cut flowers, etc.) onto a 6" x 6" card adding a die cut or two from my scraps box as well.

I was surprised how well different colours worked together - I would probably have not put the blues with the greens!

At this point it is important to take a photograph as it is almost impossible to remember where you had everything once you take it to pieces to start sewing around the edges.
Sewing - yes sewing! I decided as I was not going to be inking anything and so far the card design had taken me minutes a bit of machine stitching would make it all look a lot better. So out came the sewing machine. Now if you are new to using your machine a few little pointers might help you.

1. Set your machine stitch to its normal settings for tension and try it out on different thicknesses of cardstock first. Don't worry what the back looks like, unlike sewing lessons at school we only see the front and if it looks ok - that's fine!
2. I set my stitch length to 2.5 (on the Bernina). Too large and it looks out of scale with your papers, too small and the cardstock will rip.
3. Start and finish on a piece of the background or border that will be covered up. I know this sounds obvious but when you get the paper in the machine that sort of thing goes out of your head!
4. I don't worry about taking the threads to the back I just trim them off as they are going to be covered up by another layer. You can always put a little bit of PVA on the ends on the front of the card if you think they will unravel.
5. Don't stick anything down with double sided tape or glue before sewing. Just a tiny bit of tape in the middle of the paper is all that is needed, otherwise your needle will get gummed up.
I actually really love sewing on my cardstock and feel it adds a lovely finish - not bad for someone who was described by her needlework teacher at the age of 14 as "a great plodder" !

As you can see I have not sewn everything, just the background pieces and then the border separately, otherwise it does get rather thick and bumpy.

Once this was completed I did blend a little Vintage Photo Distress Ink around my fussy cut pieces to take the white edge away.

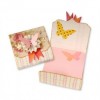
And here are the finished cards - lots of lovely layers and details but post friendly! I have used a very thin sticky mount on the back of the Celebrate and Teapot tag, just to give it a little definition. (I checked with my local Post Office and found that all of these layers, plus the sticky mount are acceptable for ordinary post.)

Again I used a very thin sticky mount on the back of the tag and die cut.

And here is another card I had on the go at the same time - I just love that rose!

A few close ups.

I cut three of the lovely tags, stamped them with the text and blended the edges with a little Vintage Photo Distress Ink. I have used these inside the card, although they would look rather nice on the envelope as well.

So, the start of my birthday card collection for this year - a little different to my usual style, however, I have used up more of my Graphic 45 scraps and it is nice to know they will travel to their destination safely.
Thank you for joining me today and I hope this gives you some ideas for using
up some of your scraps.
up some of your scraps.
Jennie


