Saturday 30 April 2016

A Fond Farewell

Hello all, it's Alison here from Words and Pictures.  I'm here today with a very fond farewell to the Country View Crafts Design Teams.  This will be my last post for both the Projects and Challenge blogs.  As most of you will know, work has taken me out of action in Craftyblogland lately, and - happily/sadly - the rest of the year is just as busy.

So I've reluctantly decided that I have to be sensible and free up some of my time by cutting back on DT work.  I've had the most wonderful time on the team here - and my thanks go to Susan, Chris and Brenda, as well as to all the fantastic designers I've served alongside here.  But I've a final project to share with you here - some journalling pages full of excitement about whatever life holds next.


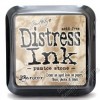
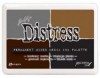
I'm afraid I don't have very many making-of pictures as I got caught up in the doing... but there are a few guiding steps along the way.  I started with an old hardback book and a rough coat of gesso before stamping some of Tim Holtz's lovely watercolour hearts in Pumice Stone and Weathered Wood.  I inked the stamp and lightly spritzed with water before stamping, so you get a loose spontaneous look to the stamped image.


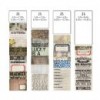
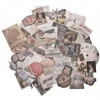
Then I gathered some cards from my much-loved Idea-ology Pocket Cards.  I don't use them for pockets, but there's such a variety of designs and in lots of different sizes that they are perfect for collaging.


Before sticking everything down, I roughed up the edges a bit, to give a more distressed look and add texture and dimension.


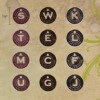
I selected my cards mainly based on colour tonality, but suddenly found I had these insistent question words dotted around, full of energy and on the look out for what's next...


Who?  What?  Where?


And there are some pieces from the Vellum Thrift Shop Ephemera Packs - both plain and vellum - too.


I did quite a lot of inky shading and painty splattering to add extra depth and extra life.


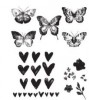
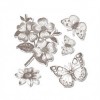
The butterflies are punched from another of the Pocket Cards, using Tim's butterfly punch - perched ready for take-off.


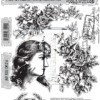
The woman is the wonderful Gloria Swanson - the brilliant silent film star who played an ageing silent film star, a grotesque version of herself, Norma Desmond, in Sunset Boulevard.  (One of the most famous exchanges from the film is my quote for today over at Words and Pictures, and there's a link to a clip of her in action - well worth a visit!)  You can see I used some doodled penwork to frame the picture.


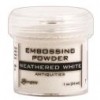
And I added some of the tiny watercolour hearts, echoing the blue hearts in the background.  These are stamped in Versamark and embossed with Weathered White embossing powder...


I love the texture of this powder, so found myself trying to find more and more spots to fit them in as an accent.  See if you can spot them all!


I couldn't resist adding some metalwork...


And of course there had to be some Small Talk stickers, again full of anticipation for whatever is next - "life was meant for a great adventure. be fearless. follow your heart."


I hope you like this page spread, and although I'm very sad to be leaving the team, I think you can see there's also a positive energy about the change.


I know the team will go from strength to strength with our fantastic new members added to the mix, and I thank all of you for all your wonderful support and great feedback here.

I'll see you out there in Craftyblogland some time!

Thanks,
Alison x


Tuesday 26 April 2016

Wallflower Scraps

Well here we are nearly at the end of another month! How quickly the time passes. 

Jennie here with you today with my second make of the month and sorry! but I had to use the doily again!


Now I did say at the beginning of the year that I was really going to try and use up some of my scraps this year. My beloved and much used Tim Holtz Wallflower Paper Stack is now looking like this:


But it is amazing that as you start looking through you can find enough to make a simple card (with a feel good factor too!).


The doily was cut again in cream cardstock. Now this is just as it popped out the die and you can see how cleanly it cuts - just one or two little bits to pop out.


I had found a bigger piece of the green for the base of my card, but I managed to punch these flowers out of really small scraps! They got a spritz of water and a scrunch and then were left to dry.


Then everything got layered on the card. I had cut the doily down a bit to fit the scrap cardstock and the oval was die cut again from a very small scrap. The flowers were layered on top of each other and clustered with a stamped butterfly and a few more of the punched leaves I seem to have on everything these days!


A stamped sentiment in the bottom corner and a few gems and I was finished.  Another card for the birthday box and it feels so good to have used a few scraps.

Thank you for joining me today and have a great week!

Jennie x


Sunday 24 April 2016

A rose by any other name

Well it has been a very long time, but Trace here and I am so pleased to be back to share a project with you , using lots of lovely goodies from Susan's wonderful shop!

So here , goes ... I have made a gift box using, the gorgeous Lady Rose stamps from none other than Tim Holtz and a neutral palette that I love...so here goes...I'm a bit rusty , so be gentle.


and here are some of the details..


So now for the how to... you may need to grab a cuppa...

I started by painting all the of the papier mache box using DecoArt media paint in mid grey 6 and letting it dry.


I wanted to give some hidden texture , that could be painted over and for more delicate finish than texture paste I opted to use clear embossing powder.
I inked up the rose stamp from the set using perfect medium, stamped onto the box and then sprinkled with clear embossing powder and heated till the embossing powder melted. ( I remember the first time I saw embossing and that was the start of my stamping journey! its like magic :) )


I repeated this on the corners of the base of the box and also on the opposite corners of the lid.


I then painted the outside of the box using DecoArt Media paint , in titan buff....a favourite of mine... I applied two coats, lightly wiping back using a baby wipe from the embossed design , on the lid only.

I then sanded lightly over the embossed design , to really let the grey show through and create a distressed finish.


To highlight the texture further and to add layers of colour I swiped across the sides using frayed burlap distress paint , using dabber top ( you could use cut n dry if you have a flip top). I added paint , smudged with my finger and rubbed across with very damp baby wipe , playing with the layers until I was happy.


Now for Lady rose herself.... I cut a piece of the new Tim Holtz plain tissue wrap and stamped lady Rose , using the new archival hickory smoke ink from the ditress ink palette. I love that I now have some of my favourite distress colour palette in permanent ink!


I also stamped some of the roses and fussy cut all of these .


I then applied to the box using a coat of the new collage medium from Tim Holtz...and when placed and happy applied another coat all over to seal the box.

 I love how you can stamp whatever you want onto the plain tissues wrap and then apply using the collage medium for a great finish.

To add some subtle details to the outside of the box I used a small stamp and pumice stone distress paint.


To complete the top of the box I added a small talk sticker lightly inked around the edges with walnut stain distress ink and two small butterflies that were punched from patterned Tim Holtz paper,  using Tim Holtz small butterfly punch and inked with walnut stain.


here is a view of the side of the box...


It may be soft and neutral but its amazing how much you can pack in with just a few soft colours.


So hope you like my make using lots of new goodies and some trusty old ones too.

keep those fingers inky!

and be back sometime soon .x
Trace x