Saturday 28 November 2015

Peaceful Forest

Hello all, Alison back with you again today and - wonder of wonders! - I have a card for you today.  I'm so sorry that I don't seem to have any process photos for this one - I got wrapped up in the creating - but it's honestly pretty simple, so let me take you through what I did to make it.


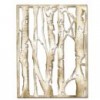
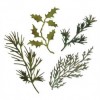
From the moment I saw Tim Holtz's Birch Tree Thinlits die, I knew I "needed" it, but this was my first chance to have a play.  I cut it out of white card and then started blending Distress Inks on to the trunks of the trees.


I used Pumice Stone, then Hickory Smoke, then some very subtle touches of Ground Espresso and Black Soot.  I also used a pastel pencil in dark grey to add some markings, and then softened them with some paper towel.


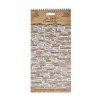
For the background between the trees, I used a sheet of Ranger Watercolour Paper.  I put Stormy Sky, Wilted Violet and Chipped Sapphire Distress Inks on to my craft mat (direct from the ink pads), spritzed the inks with water and pressed the paper down onto them.  I dried the result, then dipped and dabbed again and again until I liked the look.


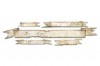
I glued the two layers together and trimmed as necessary before using the Paper Distresser to give the edges some texture and dimension.


That panel is then matted onto another layer of white card, also distressed, and the whole thing is then glued onto some plain white folded card.


I cut the word from the Handwritten Holidays thinlits out of the same card...
... a little prayer in these troubled times.


I spattered Chalk Fresco paint with a fine paintbrush, including on to the white background.  I'm really enjoying white on white at the moment for some reason - perhaps its fragility reminds me of our own position here on earth.


Some simple stamping on the inside - using Wilted Violet and Chipped Sapphire combined on the stamp - provides the greeting.


I hope you like it, and I'll see you in December... here we go!

Alison


Thursday 26 November 2015

Little Wishes


Hello again, Jennie here with my second make of the month and as promised it is another 4x4 Christmas card. 


I started with a piece of white cardstock and embossed it using the Greetings Embossing Folder. I find it easier to cut it to size first before embossing otherwise the edges have a tendency to tear when you cut it. I gave it a good coating of Festive Berries Distress Ink and blended a little Gathered Twigs around the edges and here and there over the embossing. (And yes I had hands to match!)


 I die cut two snowflakes from white cardstock and gave them a covering with Picket Fence Distress Paint and gave them a blast with the heat gun. A little blended Gathered Twigs around the edges gave them a bit of definition. I cut the smaller one from some old text paper and again blended some Gathered Twigs around the edges.


And then it was down to sticking the embossed layer onto my card and layering the snowflake. I found a little strip of music paper in my scraps box and there were enough scraps left over  from the snowflakes to make a little white border and a tag.


Another card for the Christmas box and again one which could easily be batch made.

Thank you for joining me today and I hope your Christmas preparations are proceeding a little better than mine !!!!

Jennie


Monday 23 November 2015

Poinsettia Blueprint Christmas Card


Hi it's Brenda here and I'm joining you you with a Christmas card today that you can make quite quickly and add to your box. I am pleased to say I am getting a few done now and glad I have started as things seem to be getting manic with project deadlines and family life.

The background was stamped using the sentiments from seasons silhouettes with embossing ink and heated with a sparkly white embossing powder. This was then selectively dipped in festive berries and mowed lawn distress inks.


Stamp the poinsettia twice cutting them out without the leaves on one. Dip the smaller part in festive berries, fired brick and abandoned coral distress inks. Put them together having blended the edges with your favourite brown distress ink then add a small amount of pinflair or collal glue gel to the middle and stick in some dried natural seeds to make them look like the berry centre.
I then dipped the lower piece in in pine needles and twisted citron and I just love the colour combination and blending that occurred.


Die-cut holiday greens holly using green paper and also dip that in twisted citron to get shade variations on the leaves and edge with ground espresso.


The banner was simply dipped several times in festive berries drying between each dip and seasonal chit chat words added.


I put it all together with some natural fibre behind the poinsettia.


I hope you like the brighter colours for me and a fairly simple card to make and get in the post.


Enjoy getting all your Christmas cards made, it won't be long till the big day now.

Thanks for stopping by.

hugs Brenda xxxx


Friday 20 November 2015

Fresco Tag

Hello! it's my pleasure to be let loose again to share another project with you. Mindful of the upcoming festivities I have made a simple tag that can be easily converted into a card or party invitation or gift tag and easily replicated if you, like me, have lots to make! It's a little hard to photograph but I used metallic paint as highlights.
I started by painting a tag with very watery paint.
I then mixed some watery white paint and painted the tag. I just wanted to give a hint of the white paint so I patted it dry.
The tag then has a nice painty texture. I ended the tag to reveal the tag beneath to add even more interest to the background.
Then I stamped the images as per the main image at the top of this post with the bauble stamped again on white card. Again, I painted the bauble with watered down paint, with more paint added to where the natural shadows would be.
As a final flourish I added painted highlights which really catch the light - even if they're hard to photograph!
Thank you, as always, for popping by.