Saturday 30 August 2014

Lynne Perrella journal pages

Hi everyone, Brenda here with you again today and I thought I would share a double page spread from my journal that I made for the last workshop I did for Country View Crafts. We spent most of the day learning new techniques using Dylusions ink sprays, and then I used these pages for an inspirational project at the end of the day where the participants could either ‘case’ these or make a page in their new journal from scratch.
P1170024
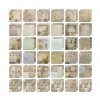
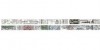
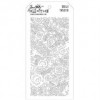
The backgrounds were made using Dylusions sprays and the ghosting and ink monoprint techniques, building layers of colour and interest. (Please leave me a comment if you would like me to do a step x step on either of these).
P1170022
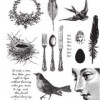
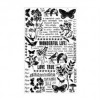
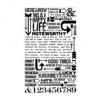
I used the LPC O23 set of stamps from PaperArtsy, plus the banner from LPC 005 collection. The face was stamped straight onto the background and I used a black and white posca pen to add highlights, shading and outlining.
P1170021a
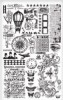
The main focal image here was stamped onto prepared card using acrylic paints whilst the other images were stamped straight onto the background. I also used the faux bleach technique to pull out colour in some areas and then painted them in again with coloured or white inks.

Thanks for stopping by to take a peek at what I have been creating and just to let you know my new workshop is available to book on the shop site. We will be making a memories box originally designed by our fabulous CVC leader Chris and you can finish it in your own style using Sweet Threads papers by Basic Grey. If you fancy a fun day of cutting, inking and construction then do pop over for more details.

Thanks for looking.

hugs Brenda xxx

Thursday 28 August 2014

mini fold book

Well it is trace here with another make and this time I have made the most of some of the gorgeous papers in the Wallflower paper stack. Gosh these papers are so gorgeous it is hard to get cutting! I have made a mini folded book , containing simple stamping, remnant rubs ons and a little texture paste.


And here is the book unfolded ...


This book would be great to add small photos, of maybe make a small quote book. 

I started with two pages near to the back of the 12 x 12 stack, where the designs are 3 x 3 " . I cut the strip...giving me 3 pages of 3 x 3 from one page and repeated with different designs from another piece of 12 x 12 " I then creased along edge of designs and folded ...below are the two lots of  pages ..


I then attached one set of 3 x 3 pages (remember there are 3 pieces here and 3 in the other set ) to the other set using tissue tape and creased and folded to form the basic book... So unfolded the book will have 6 pages created on the 3 x 3 designs .

I then scuffed the pages with a tonic edge distressing tool and edged the pages with walnut stain distress ink.


Now to add some texture ...  I applied some antique linen distress paint and some white texture paste to the craft sheet...I then mixed using a spatula.


I then applied the texture paste through the doily stencil in various places in the book.


For the cover , I added some chit chat stickers...I fussy cut some of the butterflies from the second sheet of paper and added to the cover, only gluing to the middle, I added some vintage photo distress glitter to the bodies. To close the book I tied some seam binding dyed with distress inks, into a bow. I added a hinge clip to close pages and tied some seam binding to it.


Here are the pages inside...I added some stamping in jet black archival and also added lots of rub ons , but you could decorate the pages how ever you want .


Here are the pages that I have decorated ...


Well hope you like my make , all supplies are listed below :

Tuesday 26 August 2014

Swirly embossed bauble

Hi, Amanda here and I'm going to mention the 'C' word! Although I mean to do a little Christmas crafting all year round, I rarely get round to it until September. So today I thought I'd share a fun Christmas project to get me started. I've made a clean and simple card using a Sizzix Framelits set that includes an embossing folder to make a large bauble, and a second folder with matching dies featuring coordinating images and greetings. The bauble is embossed onto card that I coloured using alcohol inks applied with water.


First I put a few drops of botanical and cranberry alchohol ink into a shallow tray of water and blew the water to make some swirls:


Next I carefully laid white card onto the surface of the water, then set aside to dry. Slightly glossy card is ideal for this - I recycled some packaging.


Once dry, I embossed the swirly card with the large bauble design and cut out, positioning the bauble to make best use of the pattern.


I then highlighted the embossing and edges by applying a mixture of gold alcohol mixative and peeled paint distress ink with cut-n-dry foam.


For the greeting I embossed some gold mirror card first with a frame, and then with word 'Joy' before cutting out with the matching frame die. I used a little low-tac masking tape to hold everything in place:


Next I cut panels of green and red scalloped card and a few centimeters of gold thread and got everything together.


The large bauble design features a small bauble in the centre, and the detail embossing folder features a matching bauble. I embossed, cut, and inked this small bauble, curved it a little and added it to the large bauble with a small gold gem.


I fixed the gold thread to the top of a panel of green card, wrapping it around the back for a neat finish, then matted onto the red card, fixed to a DL card blank, and added the greeting, bauble, and a gold bow.


Thanks for visiting, and happy Christmas, er, I mean crafting!

Amanda