Monday 30 March 2015

Bookbinding Workshop

Hi everyone, Brenda here and I would like to share some photos from yesterday's Essential Bookbinding workshop that we held in Flitwick, Bedfordshire. But before I do I am sure you will join me in saying HAPPY BIRTHDAY  to Chris, who celebrates her birthday today. Chris runs this blog, the Country View Challenge blog and does some bits behind the scenes as well, hope you have a wonderful day full of some lovely surprises Chris.

So onto some photographs. The ladies who joined me had a fabulous day learning to sew signatures together and neat ways to bind a book and although people didn't necessarily get finished, they mostly made a hardbound hard spined book, a hardbound soft spined book and a pamphlet notebook.

The morning started off with me explaining what we were going to cover through the day....


.... and then demonstrating how to sew the signatures together and glue them to fill in the gaps.


As always it was a busy and industrious day but people got together to have a chat and catch up with friends.


Sandra


Jackie


Penny


Kate


Ann


Lorna


Donna


At the end of the day everyone had at least two completed books with just the decorated covers to be finished at home.


Thank you ladies for a most enjoyable day, it was lovely to see you all and to share some fun and laughter, some pastries and cakes as well as some hard work in leaning new techniques. As is usual in a workshop you all got to different end points with Penny managing to get all three books finished before she went home but I know from your fabulous comments you enjoyed the day and learnt a lot and as Donna said she couldn't wait to get home to finish hers off and to make some more.


Once everyone puts their collage pieces on the front they will have a fabulous collection of books to use for different purposes.

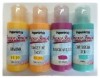
My next workshop will be on the 6th June and will be focussed on the new Decoart products that Susan has in stock, particularly the media line. Using acrylic paints, sprays, texture mediums and gesso you will learn how to create different metallic effects, making your own sample cards and using one or more of the techniques to alter a box to keep them in. If you would be interested in this class keep your eye on the shop website to be able to book it.

Thanks for joining me today.

Have a great week.

hugs Brenda xxx


Saturday 28 March 2015

With love

Following on from my journaling post earlier this month I thought I’d share a stencilling trick that’s known as ‘bumping’. The idea is to create a shadow to your stencil. There are some excellent videos showing the technique so have a look on YouTube! Once you’ve mastered this pretty easy technique you can use it on your journal pages as well as a whole host of other projects!
I painted an mdf board with white paint and then, using a stencil, I added blue paint with a small square of Cut and Dry foam. Then you simply move the stencil a couple of millimetres in one direction and add a second colour, in my case white again. Lots of people say you do the pale colour first and the darker colour second but I find that both ways work!
Once it is dry, lightly sand the whole board and this will reveal the colour underneath.
Then I added some stamped images and Gathered Twigs Distress Ink at the edges. I thought the stamped images looked a little stark so I sanded the board and voila they were softened!
I stamped the flower and stalk on cream card and painted them with watered down paints, building up colour where I wanted deeper hues.
I added a label and adhered the stalk and flowerhead. I only glued the stalk and leaves so that the buds stand proud to add a little interest! As always, thank you for stopping by!


Thursday 26 March 2015

It’s Cracked Pistachio time!

IMG_6966 copy
For my second project this month I am still playing with cracked pistachio distress ink and butterflies but  a little more grungy than my first! (You can see it here.) I have also used the fabulous mixed media thinlets – another new release from Tim Holtz / Sissix this year.

I started with some kraft card and gave it a spritz of 3 different distress sprays; shabby shutters, weathered wood and scattered straw. I allowed it to dry and then flicked a little water over it too. This makes the background card.
IMG_6942-1
I took some white card and spritzed with pumice stone distress spray and once dry took my blending tool and cracked pistachio distress ink and covered the card. I flicked over some water and allowed it to dry. I then cut opposite corners with one of the mixed media thinlet dies.
PicMonkey Collage
I prepared another piece of card in the same way and cut and embossed the butterflies using the Butterfly Duo Bigz and Texture fades. I then added some gathered twigs distress inks over the embossed areas. (No process photos here – I did these at a friends as I don’t have the dies.)
IMG_6949-1
Finally I stamped ‘Life is Good’ from Tim’s Simple Sayings stamps and put my card together.

Thanks for visiting today.
Nikki – Addicted to Art.