Showing posts with label Trace. Show all posts

Saturday, 14 October 2017

Be Original


Well Trace here today , with another distress oxide and paperdoll creation...full of inky yumminess! So here is the card and all the details follow below:


If you are not able to get the paperdolls , you could still create something similar using a found relatives image cut out or a stamped image in its place...but they are gorgeous things to play with!

I have used many collage items, some dyed seam binding, idea-ology and some of the new Tim Holtz tape...


To create the background I applied broken china, cracked pistachio and vintage photo distress oxide inks onto the craft sheet, I spritzed plenty of water and swiped the card through the inky droplets... heat dry and then re dip and continue to dip and dry until you are happy.


I then applied some distress oxide ink ( vintage photo ) through one of my favourite stencils lattice stencil 019 - in the corners of the card front.


I edged the card in vintage photo distress ink using a mini blending tool.


To create the layered collage piece I placed some of the new snippets together and glued them into place ...having scuffed and inked the edges.


to complete the overall look, I applied some broken china distress oxide ink onto a craft sheet, spritzed with water and then dabbed in the collage pieces to pick up some of the gorgeous blue ink.


below shows the details of the finished card and shows where the collaged pieces have picked up the blue ink..

doing this with the oxide inks helps to tie all those pieces together.. and the oxides have such a gorgeous finish ..


To complete the piece I added some flowers cut using the new thinlits dies - small tattered florals from Tim Holtz, and I cut these from a piece of card coloured using distress oxides ink..

I added some of the gorgeous film strip from idea-ology , adhering using mini attacher staples..I added a paper doll, sanded lightly and inked around the edges with vintage photo distress ink..I also added some rub ons to add more layers of detail


I added more of these tiny flowers and a quote chip- these are fab as they create such great dimension


To the side of the card I added some dyed seam binding, dyed using broken china distress ink..


To give the paper doll dimension I added some foam tape behind the girl and added here on using this 


So there you have my inky and idea-ology filled card...


hope you like it!
trace x

Wednesday, 2 August 2017

haunting melodies

Well it has been a while but Trace here with a Tim Holtz filled tag ... my make for today is a Halloween inspired tag using lots of the new Tim holtz goodies.

So here is my make :


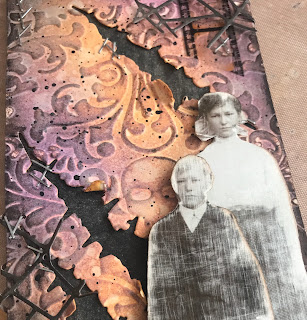
I started by embossing the tag using one of the new folders damask skulls


I then added some colour using distress oxides in wilted violet and spiced marmalade, I flicked water over, re-applied colour and then added more water.


the colour highlights the texture brilliantly and shows how wonderful the texture is ..


To highlight the texture some more I applied some distress crayon in black soot and also
 edged the tag with distress soot crayon


I then die cut the tag using three of the claw marks from the new Tim Holtz Halloween dies and then layered the tag over a black inked tag, I added lots of mini attacher staples and I also splattered some distress paint in black soot.


here are the details of the staples..
and sanded away some of the texture


whilst waiting for the new paper dolls I cut out these figures from a found relatives card and sanded so that they took on a more ghostly appearance


I added some film strip pieces


I also added a token at the bottom part - I also added the new die cut cobweb


I completed the top of the tag with dyed seam binding


here is the complete tag :


and here it is with a few twinkly lights :


so that's all for today..

hope to see you soon 

Trace x

Sunday, 16 April 2017

Hippity Hoppity

So Trace here today with some Easter cards that I have created using lots of yummy distress oxides and lots of other goodies..


I started by applying some matte texture paste through Tim Stencil, no 034 and leaving to dry. I applied at top and bottom of piece of card to fit card front in opposite corners...I love the crisp design it creates .


So I will carry on with all the details for the orange card and all the steps are the same for the greeny toned card and the tags  - yes I made matching tags too...


I started by smooshing some distress oxides onto my craft sheet and spritizing with water..( here I used worn lipstick,fozzilised amber and spiced marmalade ditress oxides )


I swiped my card through and dried, spritizng with a little water and repeated this dipping and dabbing and drying between each layer, spritzing a bit more water until happy...I just love how the colours layer and the effect of water is something special!


I used the left over oxides to dye some seam binding, spritzing, dipping in left over colour and scrunching in a ball, leaving overnight to dry as I like the crinkle you get but you can gently heat dry if you're in a rush.


For the green colours I used peeled paint, fossilized amber and a smidge of cracked pistachio distress oxides.


Mr Bunny was cut from a movers and shapers Tim Holtz die and covered with a layer of grit paste which I dabbed my palette knife into to create texture...once dry he was coloured with ink and distress crayons and his little bow added.


The flowers were cut from a piece of card already coloured with the same technique using the distress oxides as for the card from without texture paste ...I then used the new Tim Holtz thinlits - small tattered florals die cut lots of flowers and leaves that were edged with brown distress ink.


I added some distress ink in brown to the edges of the card having added coloured panel to card front, I used ground espresso distress ink.


To completed the card I added a stitched oval piece, also coloured in same way, Mr Bunny, the hand dyed seam binding and the flowers and leaves with potting soil enamel accents for centres and finally a stamped greeting using black soot archival and Tim Holtz crazy talk stamps..


and here is the completed green tones one...


I also made some matching tags , minus the paste in the same way ...


And people are always asking how I use my tags ...so here is how...this was part of an Easter gift for my Mum and Dad...and I think the tag looks so much nicer than a bottle bag...


so there you have my Easter makes
Have a Happy Easter

trace x

Thursday, 16 March 2017

Make A Wish

Well Trace here, like many Tim Holtz fans the distress oxide inks are featuring in my stolen moments of playtime and todays make is using them ...and I am in love with these gorgeous inks , although,  limited time to play means I feel I have only scratched the surface of what they can do ...

So when all my ideology goodies arrived from the lovely Susan ... including my eagerly awaited paper dolls, and boy I was not disappointed they are gorgeous!!  I found  a few stolen moments to play..and here are the results :


I created this card using a distress oxide background and then added some flowers from the new botanical paperie - which is crammed full of gorgeous elements to add to cards and or mixed media, collage and just so many to choose..and of course a paper doll - there are 107 to choose from in all sorts of sizes and they're all gorgeous ...
I also used some of the new tape and one of the quote chips...so here is how ...

In my previous card found here I applied the distress oxides to the craft sheet , but for this card I applied onto the card ( as with regular distress ) using mini blending tools. I then spritzed with lots of water , using the distress spritzer gives you the combination of fine mist and bigger droplets..and heated.


To intensify the colours I re-applied ink over the top and the distress oxides allow for colours to layer over darker colours - truly amazing...and more water makes even more magic happen.. You can carry on until happy with the background .

the colours I used are : spiced marmalade, wilted violet, broken china and vintage photo.


 Now for even more distress magic, because like regular distress they react with water , I placed  down my flourish stencil (032) and then applied water using a blending tool through parts of the stencil using a moist piece of blending foam on the tool


see how it magically removes the water through the stencil leaving a soft impression on the design- I then heat set this .


  I added some design tape from the aristocrat set in the corners for added detail....


  I then added some matte texture paste through the flourish stencil on the corners and left to dry.


  Now it is all about those added details ...I sanded the edges of my paper doll and added a touch of distress (ground espresso - regular distress) I also cut a flower image in half, sanded and inked.


and here is the finished card ...


Here you can see the texture light sanding gives and it allows ink to be easily added around the edges.


 I added some seam binding - which I dyed with regular distress in wilted violet 


And look at the wonderful dimension the quote chip adds - I sanded mine and added a touch of ink.


So there you have my make ...using lots of new goodies and some stolen playtime...
hope you like it ..and I will be back as and when playtime allows .

trace x