Showing posts with label Remnant Rubs. Show all posts

Friday, 10 February 2017

Bronte ATC Inspiration

Hello its Jane here today with a debut post for the Country View Crafts project blog. Yes Susan has let me loose with a post for the shop. I apologise in advance that I am not familiar with the Inlinkz tool so I have written a list of the products I used today, with a link to Country View Crafts, at the end of this post.

 I am sharing my newest PaperArtsy stamps which popped through my letter box this week. There are so many beauties in the new release but I went for the gorgeous Lynne Perrella LPC036 set. They are a nod to the Bronte sisters and I love them.

This set shrieks Jane Eyre to me so I wanted to do something book inspired.
I coughs ahem....have never made any ATCs (Artist Trading Cards in case this is new to you) before. They have been around for years but I have never really thought about making them.  However last week I had fun mono printing with my Gelli Plate (an item from my stash that had been sitting unused in it's packaging for nearly 2 years!!)
 I only have a small one but I found that my prints were a perfect size to cut down and use for ATCs. I am sharing 2 of them here today. To be ATC size they need to measure 2 1/2" by 3 1/2" and I chose to round my edges.
ATC 1

ATC2
I won't go into the details of the actual mono printing as I recently shared these on my own  blog but these are Fresco colours I used.
 I also used a book page to create the background of ATC 1..it fitted my Bronte theme perfectly. No it wasn't a copy of Jane Eyre but A tale of two Cities but shhh...I won't tell it you won't 😉
I also found that the Tim Holtz mini stencils fitted my plate perfectly.

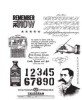
I used a couple of the spare prints for die cutting the elements I added. It means that the colours coordinate perfectly. I also used some Tim Holtz's Remnant rubs and Small Talk Ideaology stickers which again are a perfect size for ATCs.

I stamped everything with Archival inks. For my ATC2 I used the little house scene stamp from Lynne's set. For the extra stamping I used one of my older PaperArtsy sets Lin Brown Eclectica ELB23 which has some great pattern and leaves.
Here are some of the details in close up
ATC 1


I used a white gel pen for accents and to add to the pattern at the side.The Remnant Rub pen below was just right for the Bronte book theme and you can still see the book page peeping through.


I die cut some flowers with the scraps and added liquid pearls to their centres.
I also added an eye Remnant rub through the window die cut of ATC 2


This little bird is peeping in at the old English scene...could that be Jane Eyre peeping out and singing..."Heathcliff it's me Cathy"...oops sorry that's another story isn't it 😉

Thanks so much for reading my post today. I really hope that I may have inspired you to either try or revisit making some ATCs. They are such fun. Try some different colours too. There are some amazing new products to play with in the shop....and with free postage too. 

As my little ATCs say...

If you're lucky enough to be different,
never change...
it's all perspective.....

Bye for now,

Jane x

My blog is Jane's Journal do pop on over...a very warm welcome awaits you there.


Main products used;

PaperArtsy stamps Lynne Perella and Lin Brown

PaperArtsy Fresco Paints bubble gum , candy floss ,  guacamole and toad hall

Archival inks leaf green ,  watering can and  Black

Tim Holtz Remnant Rubs elements

Tim Holtz heart mini stencils

Ranger liquid pearls

Tim Holtz Idea-ology small talk stickers

If anything is out of stock do email Susan as she regularly re orders.

Sunday, 28 June 2015

A coffee lovers dream

My card today is for all you coffee lovers out there. As soon as I saw the die last January at CHA I knew I would probably buy it, but I didn't order it early enough and Susan was only sent a few instead of the bigger number she normally orders and those went to the lucky people who had got their order in early. However our lovely DT member Trace had been one of those who had managed to get it and she very kindly cut me some so I could have a play whilst I was waiting for mine to come over from America.


Process steps
Distress card with antique linen and pumice stone distress inks.

Blend pumice stone around the edges and blend antique linen through a stencil.


Die-cut the coffee/frappuccino cup in cream card and daub picket fence distress paint over, spritz it with water and heat dry. This gives a nice mottled effect to the cup and lid.


Blend pumice stone around the edges of the cup and lid and walnut stain round the edges of the sleeve.


Take the sleeve button and blend the brand new and gorgeous hickory smoke stain over it, heat dry and blend walnut stain DI over the top. Using the brand new punch from Tim Holtz and a piece of sprayed card from my oddments box I added a lovely pop of green and a link to my favourite coffee house.


Put the coffee cup together and go back to the background - add some remnant rubs.


I hadn't got a picture in my head of how this card was going to pan out and just started to gather things to put together - a piece of chevron framework and some bunting made from the green card I had used for the star.


As I put it together I also added some rock candy stickles to the lid ...


...and inked the bunting pieces adding them to a piece of coloured bakers twine.


With no metal or dimensional embellishments this card is flat and safe to put in the postbox.


Thanks for stopping by today and if you are a Starbucks coffee lover like me I think you might like this card.

Have a great week ahead.

hugs Brenda xxxx


Thursday, 12 March 2015

Noble Gentlemen


Hello Everyone and welcome! Today I am sharing a small and very quick project using some of my favourite supplies.  I love ATCs - little works of art - which are just perfect for trying out some new techniques. They are great to swap with friends and can even be utilised on Birthday Cards or as Gift Tags.


This was the background to my ATCs. I cut some light weight white board with the ATC die cut and blended Faded Jeans, Evergreen Bough and Dusty Concord Distress Inks here and there. Then I stamped the lovely corner blocks die from the Classics #15 set using Faded Jeans. I then used the Harlequin Layering Stencil to add some Crackle Texture. I like this Crackle Texture but the Ranger Texture Paste is just as wonderful. Then I left everything to dry.


My lovely Gents were stamped on Tissue Paper with Black Arcival Ink. It is not possible to stamp directly over the Texture Paste but by stamping on the tissue you can blend this in and around all the bumps and lumps of the texture you have created.


Once stamped you need to tear very carefully around the shape. Now I find this quite difficult so I use a wet paintbrush to paint around the images which makes the tearing so much simple. A great tip I picked up on Pinterest!

I used Multi Media to adhere the tissue to the inked board, smoothing everything out with a clean paintbrush from the middle to the outside.


I love the way that you can "adjust" where the pieces go. I always think these two are too far apart so I tore the tissue between them and squiggled the chappie on the right in a bit!  Once everything was dry I finished the ATCs with some Remnant Rubs, being very careful with the rubbing over the stamped tissue.


The eagle eyed of you will know that this Gent is normally looking the other way. As the Arcival Ink stamps right through the tissue (and do please do this on a craft mat or piece of paper) I was able to use the reverse and so he looks a little different looking right and not left!

Thank you for joining me today and I hope you also have some fun creating ATCs with some new products and techniques.

Jennie x


Wednesday, 18 February 2015

Napkin Art


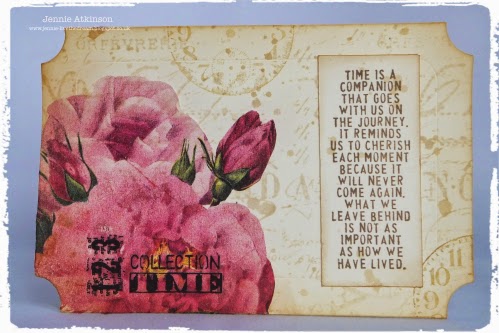
Hello Everyone, Jennie here today and I am sharing with you another page for my (Almost) Single Layer Big Ticket Die Book!


I started this page with a Big Ticket Die cut in cream cardstock and then overstamped with the Papillon background stamp in Antique Linen Distress Ink. (Ooops, the halo is the sun shining in the camera lens - but hey the sun WAS shining!!)

I overstamped with a clock stamp using Brushed Corduroy Distress Ink and added a few splatters of this colour too and also blended some Vintage Photo Distress Ink around the edges of the ticket.


I have collected rather a lot of napkins over the last few years and this is one of my favourites. I find it easier to cut around the napkin when it is in the three layers and the more expensive the napkins the easier it is. You can tear around the edge but I rather like the finish of the cut edge. I then peeled away the two white layers behind, coated the back of the napkin VERY carefully with Multi Medium (Matte) and carefully brushed it on to the ticket with a clean paintbrush. You can also add a little bit more Multi Medium around the edges if it is not sticking.


 I love this sentiment and did intend to stamp it directly onto the page for a single layer, but it looked lost with the busy background, so I ended up stamping it onto a piece of matching cream cardstock and using the same inks to age it in the same way.


When everything was dry I added a couple of Remant Rubs over the napkin.

So again an almost single layer! I think this would look lovely as a centre panel on a birthday card or for the front of a small note book.

Thank you for joining me today and I hope I have inspired you to use some of those napkins which lurk in dining room drawers!

Have a lovely day

Jennie x