Showing posts with label Idea-Ology. Show all posts

Saturday, 28 April 2018

We can't all be kings!

Hello! I found a fabulous quotation and wanted to make a quick journal page to use it! I sprayed Fresh Lime and Cut Grass ink sprays. I then used a stencil and sprayed water and let it dry.
I added a number stamp and a dots stamp in Shabby Shutters to complete the background.
I stamped out three circles, a border and a crown and used Shabby Shutters to colour them. I left the crown uncoloured to stand out in the final piece.
I added the pieces to the page along with a Paper Doll. I typed the quotation We can't all be kings...someone has to clap when I walk by on my trusty typewriter and cut them out. The circled then become bullet points.
I hope you find a quotation that inspires you to make art.
Gabrielle x

Thursday, 28 September 2017

Fright Night

For my second Halloween themed project this month I made a mdf plaque to add to my growing set of decorations for the big day.
I do need to confess that I forgot to take lots of photos (sometimes we get caught up in making the piece!) I started by covering the plaque with Tango paint then added Black Soot Distress Ink through a stencil.
Isn't it effective?!
I added some tissue tape, paper dolls and extra stamping courtesy of this fab Emma Godfrey set. To give the paper dolls a little more of an aged finish I sanded them and added Spiced Marmalade Distress Ink.
Thank you, as always, for popping by!

Friday, 4 August 2017

Mixing the old with the new

Hello it's Jane from Jane's Journal here today sharing some of my newest Tim Holtz buys. I am super excited that in September I will be attending his workshop and will be  playing more with his Distress oxides but for my post today I wanted to share a vintage tag I made using his Distress Oxides and the fab paper dolls , mixing them with some of my older products in my stash, particularly Tim's layering stencils .


If you would like to see the inspiration for my tag today I have linked my own blog post up here sharing a day in London seeing the "old" and the "new" in my favourite city in the world. You will see lots of photos of a sunny day out. I make "Moments" for my physical Jane's Journal to remember special occasions in my life. Sometimes I make art journal moments, sometimes I make tags. It was our wedding anniversary and we celebrated over lunch in the Fenchurch restaurant of the Walkie Talkie building. For this "Moment" I decided to make a tag.

I have provided links to the shop in my post and if any of the products I am sharing are out of stock do fill in the email request and Susan will email you as soon as they are back in stock.
I took a size 8 tag (I cut my own with the Framelits set here ) and made a background using the wrinkle free technique and 3 oxides; fired brick spiced marmalade and broken china and as these were the predominant colours I saw on our sunny day out. I kept the blue at the top to represent the blue sky we looked out to from our table.


I stencilled in some sunny rays using the rays stencil and fossalized amber oxide to represent the sunshine streaming in that day.


I used some of Tim's older stamps to stamp a random love letter background using sepia archival ink.  This is to celebrate our anniversary and 36 years of love and fun...yes I married my soul mate and I know I am very lucky.

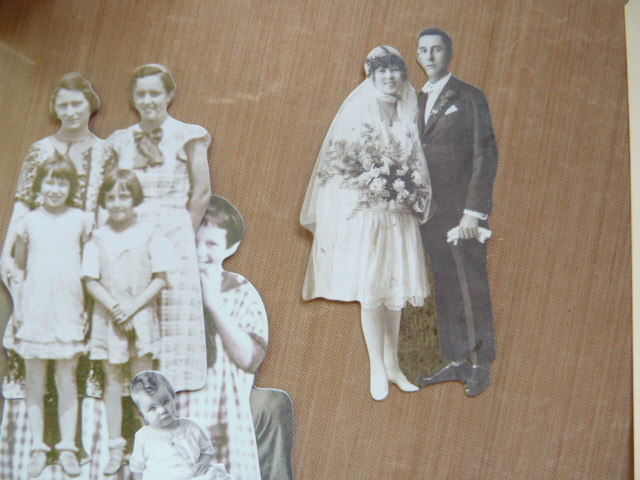
 I also wanted to use one of the great paper dolls. As I looked through the pack I found a vintage bride and groom and I thought it was perfect for my old and new tag

I  die cut an old Sizzix house, bought from the year round CVC sale page (you can find lots of bargains here all year, there are lots of Tim products there too)  a while back and snipped off the bits I didn't need and used some snippets of paper from my stash and a piece of tissue tape to anchor everything together as a mini collage.

I also used the mini heart stencil from set 6 and added some more fired brick oxide to leave "lots of love" on the brides dress and at points on the tag.

 I also added some remnant rubs from the life quotes  set. I thought this saying was perfect.

I finished off with some words from the Ideaology small talk pad and a little red heart from my stash.

Here is my finished tag.
and a few close ups. I love using the Oxides through stencils, they layer up perfectly. 


I really am enjoying playing with the oxides and mixing the old with the new.

A little heads up...Susan is expecting the new colours of Distress Oxides in very soon...I have some on pre-order and cannot wait to play with those too.  Remember that for the UK your orders are also  posted free. These inks really are a game changer in my books, I love crafting with them.

Thanks for stopping by,

Bye for now,

Jane x

Wednesday, 2 August 2017

haunting melodies

Well it has been a while but Trace here with a Tim Holtz filled tag ... my make for today is a Halloween inspired tag using lots of the new Tim holtz goodies.

So here is my make :


I started by embossing the tag using one of the new folders damask skulls


I then added some colour using distress oxides in wilted violet and spiced marmalade, I flicked water over, re-applied colour and then added more water.


the colour highlights the texture brilliantly and shows how wonderful the texture is ..


To highlight the texture some more I applied some distress crayon in black soot and also
 edged the tag with distress soot crayon


I then die cut the tag using three of the claw marks from the new Tim Holtz Halloween dies and then layered the tag over a black inked tag, I added lots of mini attacher staples and I also splattered some distress paint in black soot.


here are the details of the staples..
and sanded away some of the texture


whilst waiting for the new paper dolls I cut out these figures from a found relatives card and sanded so that they took on a more ghostly appearance


I added some film strip pieces


I also added a token at the bottom part - I also added the new die cut cobweb


I completed the top of the tag with dyed seam binding


here is the complete tag :


and here it is with a few twinkly lights :


so that's all for today..

hope to see you soon 

Trace x

Monday, 24 July 2017

Follow Your Heart

I have rediscovered my Dylusions Inks and my very favourite is Fresh Lime. This whole project was designed around this ink! The finished project looks like this:
I sprayed a tag with Fresh Lime and Dirty Martini. Dry the tag throughly.
Then, using a large Stencil with White Linen spray the tag. I didn't mind the extra ink in the bottom corner as it all adds to the whole aesthetic of the tag.
I cut out a large heart. I painted it in London Bus paint and adding some coloured pencil to the edges.
Using a Texture Fade I added some Gathered Twigs Distress Ink to the top part of the fade and then embossed the shape instantly giving it texture and a second colour.
For the final touches I added some shadowing to the largest numbers; Gathered Twigs to the edges of the tag; a paper doll; a pinecone die, a quote chip and a little torn dictionary page.
Thank you, as always, for popping by.

Friday, 16 June 2017

Can you resist this?!

I love creating resist backgrounds using paint. It can be more versatile than using wax or embossing powder because you can incorporate it more into the background. Let me show you.

Using a tag as my base I put white paint through a stencil.
Lightly mist the tag with water and spray ink over the top of the paint. Love those puddles of ink!
When dry it looks like this!
Add some Distress ink to the edges (I used brown and black)
Next I wanted a 'pop' of colour so I cut out a heart shape from kraft card and and added some red paint. I didn't want a uniform finish. A little more black distress ink at the edges finished it off.
Finally I built up the final images on the tag and added it to a journal page. I used a Paper Doll, and a Quote Chip as well as a little torn book page.
I hope you like my resist technique and try it some time!

Sunday, 14 May 2017

Tiny House

I am thrilled to be able to share my little house with you today.
It was such a lovely project to make and I know you'll have fun customising your own versions! This house is tiny so I used a simple image rather than make it look really cluttered - there is a larger die on the plate and that one lends itself to a busier finish.
Using a smooth heavy weight watercolour paper I die cut the smaller of the two dies on the Tiny House die (you'll need to do this twice) and then painted it pink using an old gift card. Try and aim for an uneven finish (like the one on the left) as it gives you a more interesting result in the end.
Add a thin layer of white paint over the top (using the old gift card)
Put a brick stencil over the top and, using white paint on some Cut-N-Dry foam, add some bricks! I used a Wendy Vecchi stencil but you could use one from Tim Holtz.
When you've done this it will look like this:
I liked this finish but as I like things a little more grungy I sanded the piece and it then looked like this:
Now, at this point I got so excited making the house I forget to take photos (doh!) but I did the following steps:
  • glue two sides together and add Vintage Photo Distress Ink on all edges
  • lie the project flat on your desk and carefully add the numbers to the bottom of the house in a continuous run
  • complete the construction of the house
  • stamp the butterfly image on some tissue paper; cut it out and adhere to the front of the house. Where the image goes over the edges make sure you use use them to help the house stay glued
  • choose a sentiment using some stickers; edge with Distress Ink before adhering to the house
  • adhere a star to the front
For the roof I die cut several strips of watercolour paper. I coloured them with Broken China Distress Ink and edged them with Vintage Photo Distress Ink. Starting at the bottom of the roof I adhered sections of the strips building up the roof tiles. You could make the tiles any shape - how about triangular?
Glue the roof to the house and you're finished! This is the front of the house:
This is the back:
I love this little house - and the bigger one is just as fabulous! I've made a mini village!
Thank you for joining in with me today - Gabrielle x