Showing posts with label tag. Show all posts

Monday, 23 April 2018

Attitude Tag - Spring is Sprung

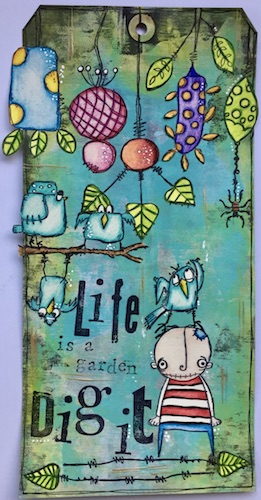
I know these aren't Spring colours but it's just how it evolved as I was making it.


Cover a tag with old book paper.


Scrape some black and white gesso randomly over the surface using the flat side of a palette knife creating some lovely flat textures.


Stitch on some vintage book/music paper or some of your favourite patterned papers. Leave the threads hanging (it's all the rage).


Take a stencil with a small pattern and with a black pen trace the shapes and colour them in. I used one of the Artistic Flair tab stencils and a black sharpie pen.


Cut some of Tim's Wildflowers from white/cream card and blend the edges with ground espresso distress ink and black archival ink. 


Adhere them to the background and finish with a word from the big chat stickers and blended ground espresso round the edges.


I managed to keep some of the book words showing that are perfect for this time of the year.


I think we have all got a bit of this ......


Thanks for coming over to see what I am sharing today if you click on the products in the text they will transport you over to the shop so you can see them and the amazing prices Susan has.

hugs Brenda


Monday, 26 March 2018

Spring or Easter gift tag

Isn't it great having the evenings draw out again and soon and this next weekend is Easter, so Spring is hopefully well on its way.
Easter eggs and gifts will be shared in a few days so I thought I would make a quick gift tag for you to make and attach to the present that goes to someone special.


Begin with distress oxides in spiced marmalade, broken china and cracked pistachio and create a dip and dry background.


 Stamp some flying bugs, I used the Entomology set of stamps by Tim Holtz and used his stamping platform to get a strong outline ( I stamped it twice using coffee and black archival inks)


Take forest moss, pine needles, tea dye and rusty hinge ordinary distress inks and with a paintbrush paint in the wings. I also used some white linen ink spray by dylusions to highlight the bodies.


Next take some scraps of paper and tear pieces to cover the butterflies and stamp the text stamp, also from the etymology set, with broken china doxide.. 


Before removing the paper lightly spritz over with water and heat dry.


Stamp the small butterflies from the classics 17 stamps and remove the little Fig. numbers, cut, distress ink the edges and adhere. Also stamp the special delivery from the correspondence set directly onto the tag.


I always 'frame' my tags, cards etc and didn't want to rely just on the normal distress inked edges so I searched my boxes of old unknown stamps and found a fabulous forgotten distressed border stamp which I used with cornflower blue archival ink.


Finally I covered the winged bugs again and splattered some white gesso and then finished with the distress inked edges.


A lovely gift tag with springlike images and colours don't you think?


Thanks for stopping by.

hugs Brenda xxx

www.bumblebeesandbutterflies.com

Wednesday, 2 August 2017

haunting melodies

Well it has been a while but Trace here with a Tim Holtz filled tag ... my make for today is a Halloween inspired tag using lots of the new Tim holtz goodies.

So here is my make :


I started by embossing the tag using one of the new folders damask skulls


I then added some colour using distress oxides in wilted violet and spiced marmalade, I flicked water over, re-applied colour and then added more water.


the colour highlights the texture brilliantly and shows how wonderful the texture is ..


To highlight the texture some more I applied some distress crayon in black soot and also
 edged the tag with distress soot crayon


I then die cut the tag using three of the claw marks from the new Tim Holtz Halloween dies and then layered the tag over a black inked tag, I added lots of mini attacher staples and I also splattered some distress paint in black soot.


here are the details of the staples..
and sanded away some of the texture


whilst waiting for the new paper dolls I cut out these figures from a found relatives card and sanded so that they took on a more ghostly appearance


I added some film strip pieces


I also added a token at the bottom part - I also added the new die cut cobweb


I completed the top of the tag with dyed seam binding


here is the complete tag :


and here it is with a few twinkly lights :


so that's all for today..

hope to see you soon 

Trace x

Friday, 16 June 2017

Can you resist this?!

I love creating resist backgrounds using paint. It can be more versatile than using wax or embossing powder because you can incorporate it more into the background. Let me show you.

Using a tag as my base I put white paint through a stencil.
Lightly mist the tag with water and spray ink over the top of the paint. Love those puddles of ink!
When dry it looks like this!
Add some Distress ink to the edges (I used brown and black)
Next I wanted a 'pop' of colour so I cut out a heart shape from kraft card and and added some red paint. I didn't want a uniform finish. A little more black distress ink at the edges finished it off.
Finally I built up the final images on the tag and added it to a journal page. I used a Paper Doll, and a Quote Chip as well as a little torn book page.
I hope you like my resist technique and try it some time!

Wednesday, 22 March 2017

Dig it

Hello! This is my second project using the new Elenazinski stamps. My first project was here. I loved the bird standing on the chap's head on my first project so I couldn't help repeating that here with a different chap!
I started by taking a giant black tag and adding Snowflake paint with a brayer.
Then I added a thin layer of Caribbean Sea again with the brayer
With my finger I added Banana around the edges of the tag
Then I stamped all my images on the tag so I knew where they'd be placed but also so I didn't have to cut out all the little details. I used  ZA02, ZA05ZA06, ZA07, ZA08 and the rather fab new alphabet stamps. The eagle eyed will notice there are no birds on the branch. I'll explain why later!
To stamp the letters, I space them on my acrylic block and check they fit before inking them and adding them to the tag.
When I stamped each image on the tag I also stamped it onto card. It's these images I coloured in. The pink and blue splodges are when I clean my blending pencil!
The birds were missing originally from the tag because I wanted to stamp them so their feet were placed on the branch (which hadn't been coloured in yet!) And apart from some gold paint on the edge of an old gift card, a little white pen and a black pen border that's it!
Thank you, as always, for popping by

Tuesday, 28 February 2017

Easter tag with Tim Holtz crazy bird

Hello Everybody,
It's Monika here with my second post.
This time I have brought you an Easter tag.
This:


And here is my step by step tutorial.

1. I cut out a bigger tag with Sizzix Framelits Tag die by Paula Pacual (658611) from kraft paper.

2. I stamped Tim Holtz background stamp on white cardstock with using Misti Stamping Tool.


3. I covered the stamped image with Ranger Clear embossing powder.


4. I put back the excess to the jar.

5. I heated the embossing powder on the stamped image.


6. I made it twice.

7. I cut out two one size smaller tags from my stamped cardstocks.

8. I inked the edges with Ranger Distress Gathered Twigs and glued the smaller tags on the big one (both sides).

9. I inked with green Distress inks a white watercolour paper and cut out the greens.

10. I placed and glued them on the tag.


11. I stamped the crazy bird and the bunny ears onto a watercolour paper with black Ranger Arcival ink.

12. I coloured them with watercolour technique using Ranger Distress markers.

13. I prepared many layered flowers a few months ago but I didn't use them, so I could just take three form my stash.

14. I placed and glued all the elements on the tag.


Supply list:

Sizzix Framelits Die, Tags by Paula Pascual (658611)


Stampers Anonymous, Bird Crazy by Tim Holtz (CMS212)


Ranger embossing powder, clear


Ranger Distress markers (Spun Sugar, Worn Lipstick, Squeezed Lemonade)


I hope you like it! Happy crafting!