
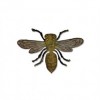
Hi everyone, Brenda here and I have been using the new Tim Holtz layered bee die. There are in fact three in the range, you can get a layered butterfly and layered dragonfly as well and what is so great is they are a Bigz die and come with their own embossing folder to create some wonderful texture on the die-cut.
I began by searching online to see what a bee really looks like up close as I wanted to see if I could replicate it in some way. I found a beautiful bee photo and started to think about what techniques I could use to get the gorgeous Tim Holtz layered bee die-cut to be somewhat realistic. It hasn't turned out as I imagined but I learnt a lot about how glassine paper works along the way lol.

I decided on glassine paper with perfect pearls for the body of the bee and acetate and alcohol inks for the wings. Although the PPs gave a lovely glow to the bee it didn’t make it stand out in anyway – perhaps I’ll try it again another time with a much lighter background. I eventually found that the distress paints over the top leaves a nice mottled look, something nearer what I was looking for and the perfect pearls still show through in places.

The acetate for the wings was heated and shaped before I added the alcohol inks and they dribbled into the channels nicely giving a great wing effect. When made up it has fabulous dimension and the bee could almost be flying.

A large cork tile became my substrate to work on – daubed with Distress paints – I used a palette knife for this stage. When dry I stamped with the text stamp from the papillon set of stamps and inked the edges with walnut stain distress ink.

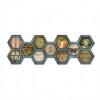
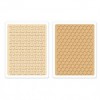
I used the Tim Holtz honeycomb embossing folder with kraft card spritzing it with water and squashing it up before adding some distress stains and then drying it. I lightly blended over ripe persimmon DI and edged again with walnut stain. The arrow was painted with gesso, layered with rock candy distress crackle paint and when dry, it was inked over with walnut stain.DI.

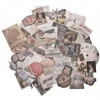
The thrift shop ephemera pack provided me with lots of small pieces for a collage plus I found a photo of two lads cut from one of Tim’s papers. It was they who inspired the saying 'Where have you been?' – as I was putting it all together I imagined this pair of lads had only just met up again after one of them have moved away when they were younger and of course they are very pleased to see each other again.

A piece of ruler ribbon, pieces from the honeycomb frameworks die and a crackled butterfly finish it off.

Thanks for stopping by today to take a look at my ‘Where have you bee’n?’ tile.
hugs brenda xxx


Totally brilliant creation, the background looks fantastic, love the idea of the cork and of course the honey comb really fits brilliantly. But the bit that makes this card regally special, is the wonderful bee!!
ReplyDeleteSensational project Brenda, must go look at the layered dragonfly after seeing how amazing you have put the bee together. Great inspiration :-) xxx
ReplyDeleteAn amazing project Brenda.
ReplyDeleteJulie x
Just love it! Jasmine
ReplyDeleteBeautiful work Brenda, the bee is gorgeous and I love all the texture you created on your cork background. Mr Bee seems to be rather popular at the moment! Hugs, Anne xx
ReplyDeleteThis really is a textural beauty, Brenda! I love those wings and the cork background has such great texture and the honeycomb piece, fabulous! Gorgeous! Hugs!
ReplyDelete