
Hello Everyone, Jennie here today, and thank you for joining me here at the yet the start of another month!

Last month I shared a Mixed Media Tag over at A Vintage Journey and a number of you asked how I had created the background. So I thought I would take you through a step by step of the different layers today. It is a little photo heavy so grab a cuppa before you start!

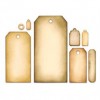
I used the Sissix Framelits die to cut two tags from patterned paper. I have used the Tim Holtz Wallpaper Stash but you will see how a lot of the pattern disappears by the time all the layers have been completed.

Next I added tissue tape. I do tear these strips in half as I find a full width strip a little dominant on a tag.

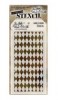
The next layer was Texture Paste which I added to the tag using the Harlequin Layering Stencil.

I find it easier to scuff up my edges at this stage as by the time the next stage is added it becomes more difficult to do.

Add a layer of gesso over the whole tag and leave it to dry.

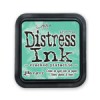
Then the exciting bit! Adding your colour onto the tag. I have used Cracked Pistachio Distress Stain Spray. To get a lighter tone spritz again with water and dab off using a roll of kitchen towel - just roll the towel over the tag. Now I used a dirty bit of kitchen towel here and got a bit of yellow on it as well. Not a good idea but here it works ok!

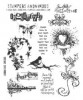
Finally I add the stamping using Black Arcival Ink. I love little stamps for this and the new Correspondence stamp set is just perfect as is the little text stamp from the Shabby French set. When everything was dry I added a few splatters with the Black Soot and Cracked Pistachio Distress Ink.

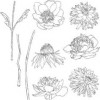
As this is quite a busy background I decided to keep my embellishments quite simple. I stamped the Coneflower from the Flower Garden Stamp Set with Black Arcival and then painted it using the Cracked Pistachio Distress Ink. Just keep adding layers until you get a mixture of different tones. When dry add a few flicks of Black Soot.

For a little emphasis under the flower I added more tissue tape, some negative ribbon and a great Small Talk Sentiment.

By this time I realised that my original background tag was too brown and my tag needed a black frame. I find it easier to sew these two tags together rather than glue them, but that is just a matter of choice.

The finished tag!
Thank you for still being with me at the end! I hope that this step by step has given you some idea of how to build up mixed media layers and that you will have a go yourself!
Jennie x


It was a complete n utter pleasure Jennie to see how you created such a delicately beautiful tag . If i were to list all the things I like about it I would be here all day! Absolutely stunning and thankyou so much for sharing .x
ReplyDeleteFabulous details and thank you for sharing your process steps xxx
ReplyDeletethis is so very pretty ennie and thanks for the step by step - fabulous! Hugs Rachel x
ReplyDeleteA fabulous 'how to' Jennie and the finished tag is stunning. Anne xx
ReplyDeleteThank you for the tutorial! It is such a gorgeous tag!
ReplyDeleteThank you for the tutorial! It is such a gorgeous tag!
ReplyDeleteSo love that you shared these amazing backgrounds - I think they are just superb! Thanks Jennie for some much needed inspiration xx
ReplyDeleteGorgeous - and thank you so much for taking us through the steps to create your mixed media layered wonders!
ReplyDeleteAlison xx
This is so beautiful!
ReplyDelete